After 10 years of shooting, editing and grading I decided that color correction should have been my main job.
During all these years I attended online and in presence courses with pro colorsists to be sure to become a pro myself.
I mainly use DaVinci resolve with a surface control and 10 bit calibrated monitors. I'm based in Italy but used to travel for job.
Ehilà Luca,
questo l'aggiornamento di oggi.
Anzitutto il mirror tool funziona magnificamente e questo ci permette, a costo zero, di avere il doppio delle variazioni (anche se magari non così significative). Non sono riuscito a far funzionare un "button" nell'interfaccia del controller (mi dirai come associare lo scrit da eseguire), per cui ho messo un integer 0/1:

ROCKET GROOMING
Born as a blocking tool to speed up my work and to have an appealing result while shaping my guides, it finally turned out that I could use it to deliver the final result in most cases.
The tool is very simple, but it gets me out of dropping the same bunch of nodes every time. And even if I could copy them from another scene, rocketGrooming has the most important parameters exposed, letting my tweaks be focused and rapid.
Being an hda it's possible to open it, change, delete, or add new parameters with ease. It's a tool that can be tailored to everyone's needs.
SMART VIZ
Visualization is everything to me, and since hair is made of thousands of thin strands, I need a tool that lets me see them clearly in the viewport. With Smartviz, you can choose many ways to see your hair, with an option to visualize clumps or other attributes.
Before jumping into details, please remember I'm an artist with little code knowledge. For this reason, this tool can be improved in many aspects, and it would be great if SideFx could build a more sophisticated and artist-friendly tool like this.
To follow the tutorial, please download the tools and simply copy them into your otls directory as described in the Readme txt included in the zip file.
IMPORTANT
These are tools I made for myself as R&D and that I'm pleased to share with you. If you want to use them in production, please do extensive tests to avoid any issue.
VIDEO OVERVIEW
In the following video, I quickly go through all the tabs and leading features of the tools. Please take the time also to read the written part where I go into detail:
For the written part, using this menu, you can easily go through the text, focussing on what you are interested in the most:
INSTALLATION
Unzip the file and put the hdas (digital assets) in your otls directory (Documents\houdini19.5\otls).
As an alternative, you can use the Install Asset Library to load the hdas from the directory where you unzipped the file:

ICONS
To add the rocket and light bulb icons, please download them from here:
Then, go to Type Properties (right click on hda), Basic Tab and load them in the Icon field:

ROCKET GROOMING
OVERVIEW
Grooming is more complex than difficult. Hair always has the same characteristics, and for this reason, I always drop the same basic nodes: hairgen, clump, noise, length, etc.
So, to speed up my work, I encapsulated all of them in an hda, and I exposed the most used and important parameters. But, being an open tool, you can make any change following your needs.
Let's have a look at the GUI:

SECTION 1
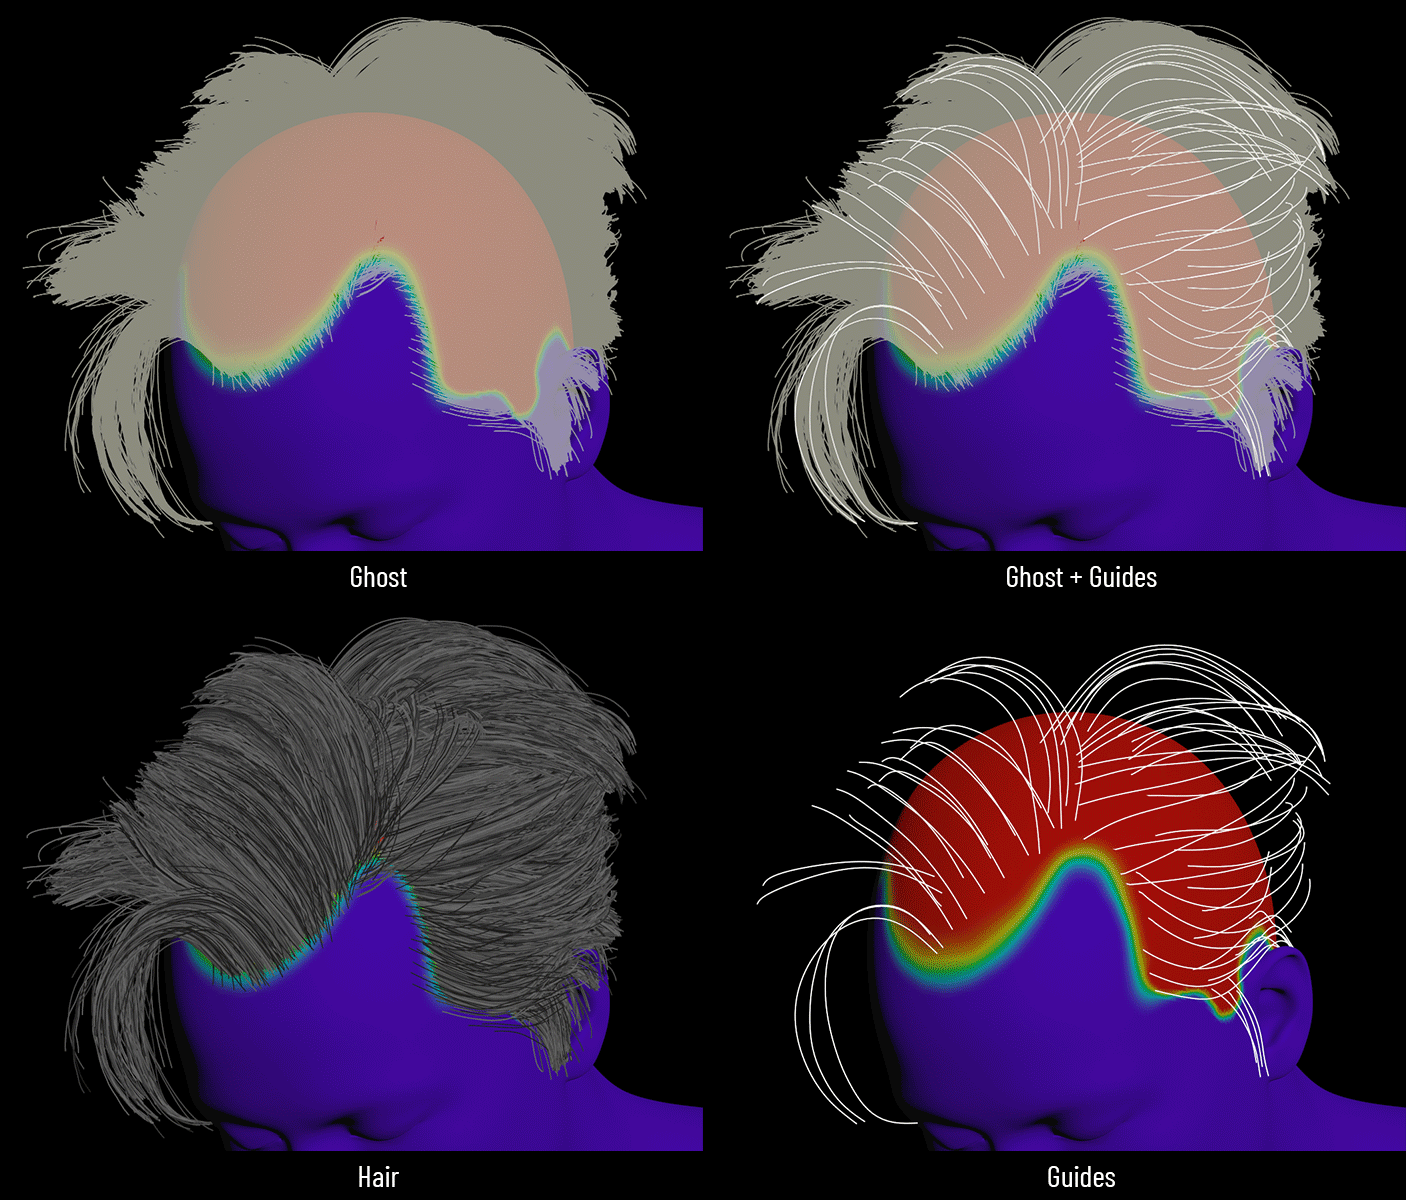
Hair and guides visualizers
When painting maps, you can use these options to Show / ghost (template) hair or show your guides. You can also ghost hair and visualize the guides at the same time:
SECTION 2
Reset maps
Here, you can reset all your maps in one hit, filling them with a value of 1.
As you can read from the alert, hairgen and baby-hair density maps are unaffected to avoid repainting them from scratch.
If you want to reset your maps individually, you can do it using the "Reset All Changes" button that you can find in the tabs of section 3.
SECTION 3
Decimate hair
Use this option to decrease (in percentage) the number of strands, maintaining the overall shape. Decreasing to a very low value lets you quickly evaluate the noise amount and frequency on single strands.
SECTION 4
Freeze and unfreeze hair
Doing this, you can paint your maps and have your grooming visualized but not auto-updating. This avoids slowing down the whole process. Once done, remember to hit the "Unfreeze Hair" to see the changes.
If you prefer to see things changing interactively, forget this option.
SECTION 5
Modifiers
I organized the tabs following a logic process, which is reflected in the graph organization:
-
hairgen
-
clump layering
-
noise
-
flyaways
-
wet effect
-
baby hair
-
final length
-
parting line
NODE SETTINGS
As you can see from the sample file you downloaded, I put all the nodes inside a Geo node called setup at Obj level:

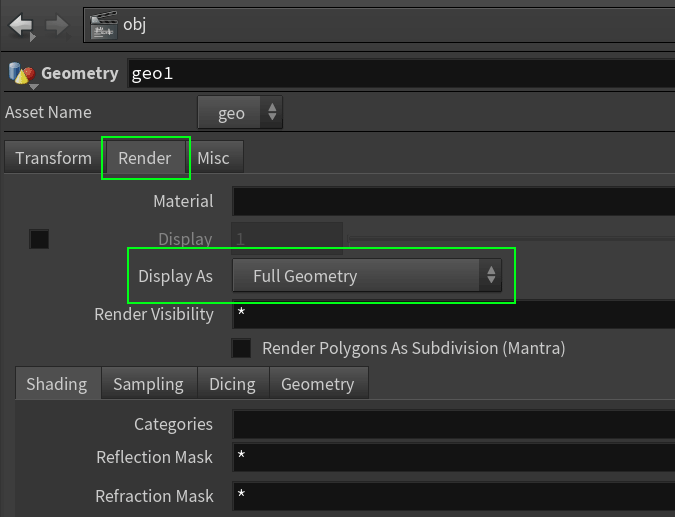
There are two important settings you have to take care of.
The first one is in the Render tab.
You have to set Display As in Full Geometry; otherwise, you won't be able to see maps (Attribute Paint nodes) while painting:
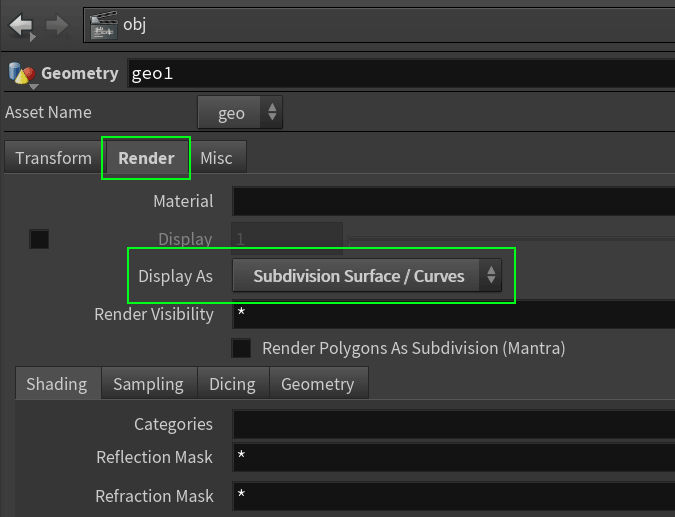
Be aware that if you choose the option View current object as subdivision (alt + middle mouse in the viewport):
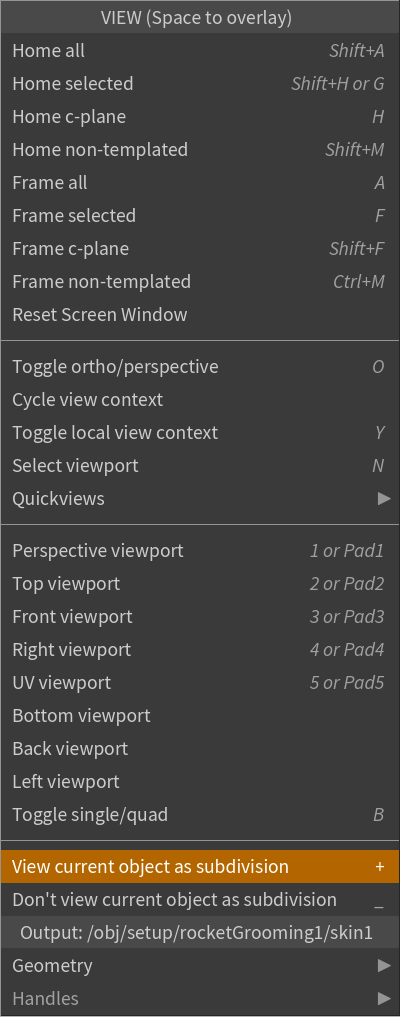
this drop-down menu changes in Display as Surface/Curves, and you don't see the maps anymore):
The second one is in the Misc tab.
Check Shade Open Curves in Viewport; otherwise, you will be able to display hair only in wireframe mode:
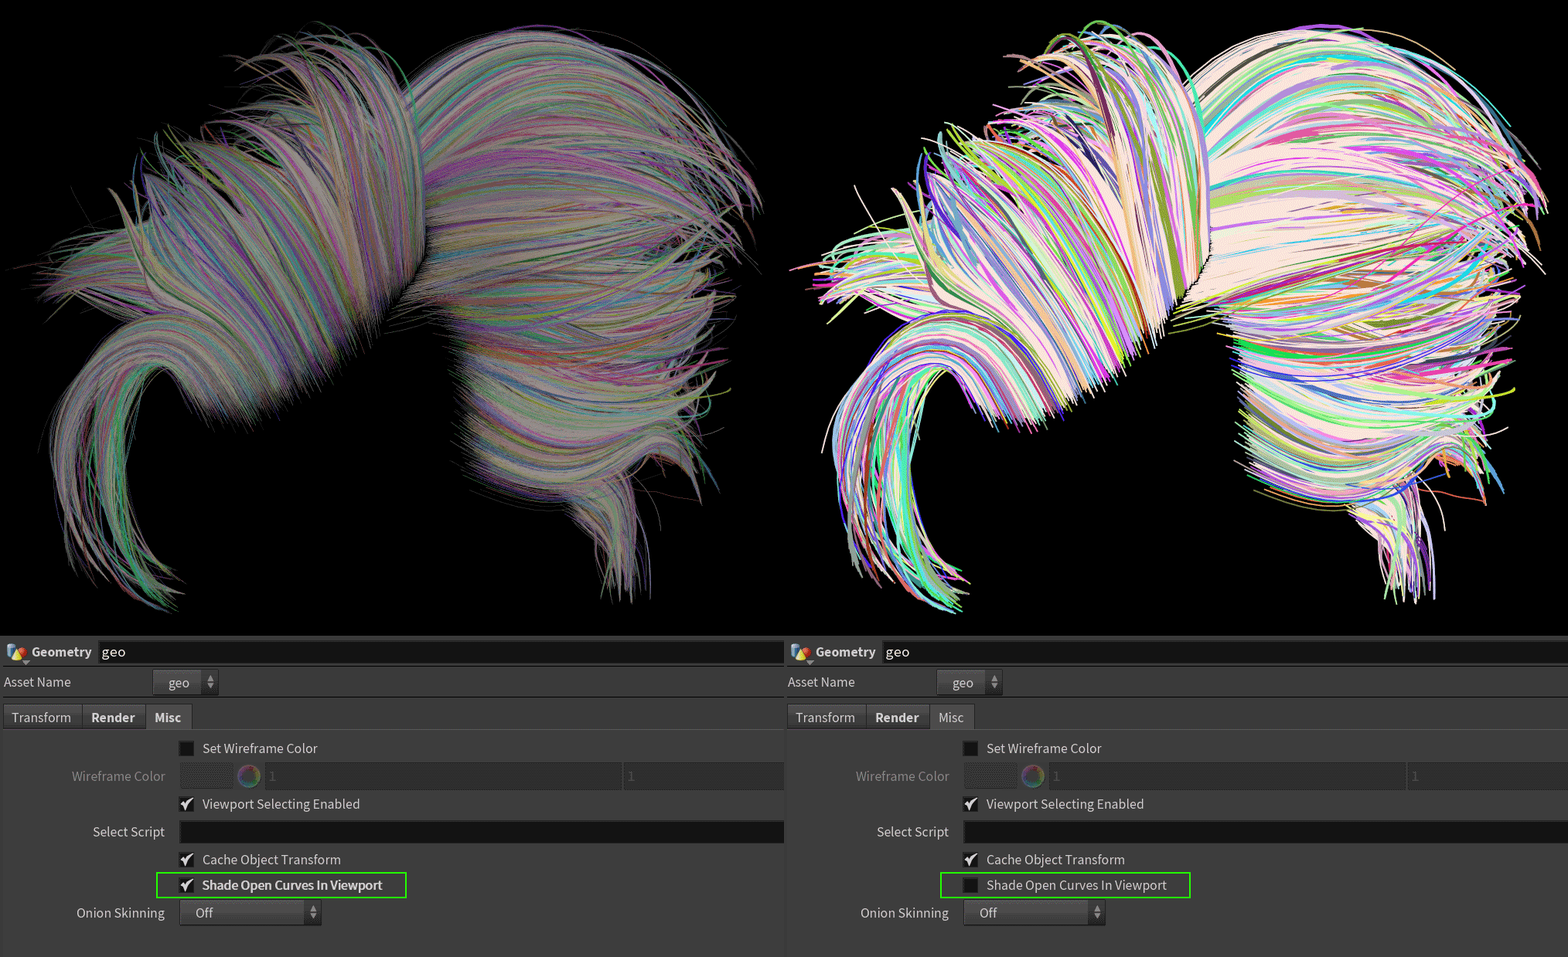
Before going into detail, let's see the node's inputs and outputs:


Quick overview of the graph:
-
1
-
the model
Add a subdivide node if you need more resolution for the maps.
-
-
2
-
VDB creation
VDB from Polygons will do the job. Use a Polyfill to close your mesh (bottom neck) if needed.
-
-
3
-
Guides
I use a node for the main guides, one for the baby-hair, and one for the parting lines. This way, everything is clear and accessible at every moment.
-
-
4
-
rocketGrooming
-
-
5
-
Smart VIz
-
-
6
-
Skin
Use this node in Template mode to visualize the skin and the dens map
-
-
7
-
Alert
Set this output in Selectable Template (ctrl + click) mode to visualize a message displaying when hair is frozen.
-
Add a Transform node after this to move the alert elsewhere.
-
Do not connect a Null to this output if you don't want to see the message.
-
-
TABS
The goal of Rocket Grooming is to speed up your work, letting you quickly find the most used parameters. This is tailored to my grooming workflow and experience. Unlocking the node, you can modify any part or build yours from scratch.
Rather than going through every tab in detail, since these are usual parameters you already know, I will give you some general guidelines on how to use it at best:
-
RESET
To go back to the starting point, click the cog in the top right corner and choose Revert to Factory Defaults.
After that, click Reset All Maps in the top part of Rocket Grooming. Remember that Hairgen Density Map and Baby-hair map won't be affected:


-
INFLUENCE RADIUS
Where: Hairgen Tab
Use the slider and the map to adjust the big clump size. Since big clumps are fed in the 4th input with the guides, this is a way to adjust their size and keep the shape.
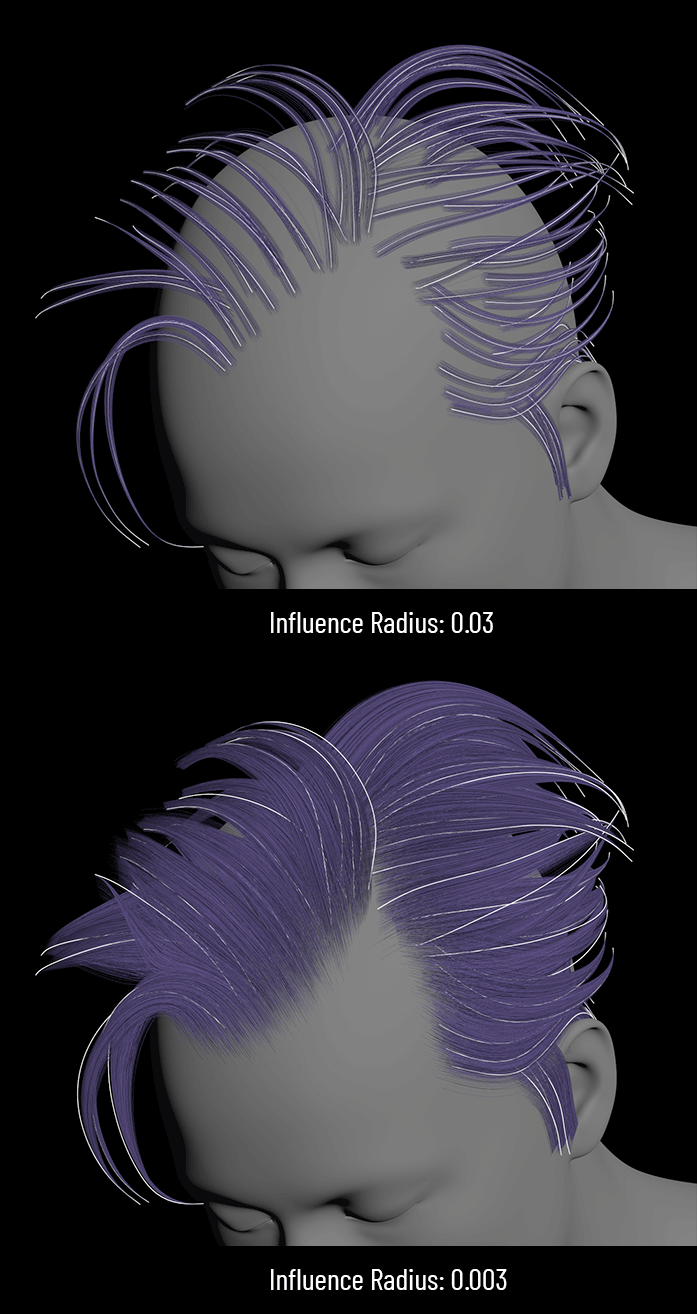
You can also paint a map to have different values:
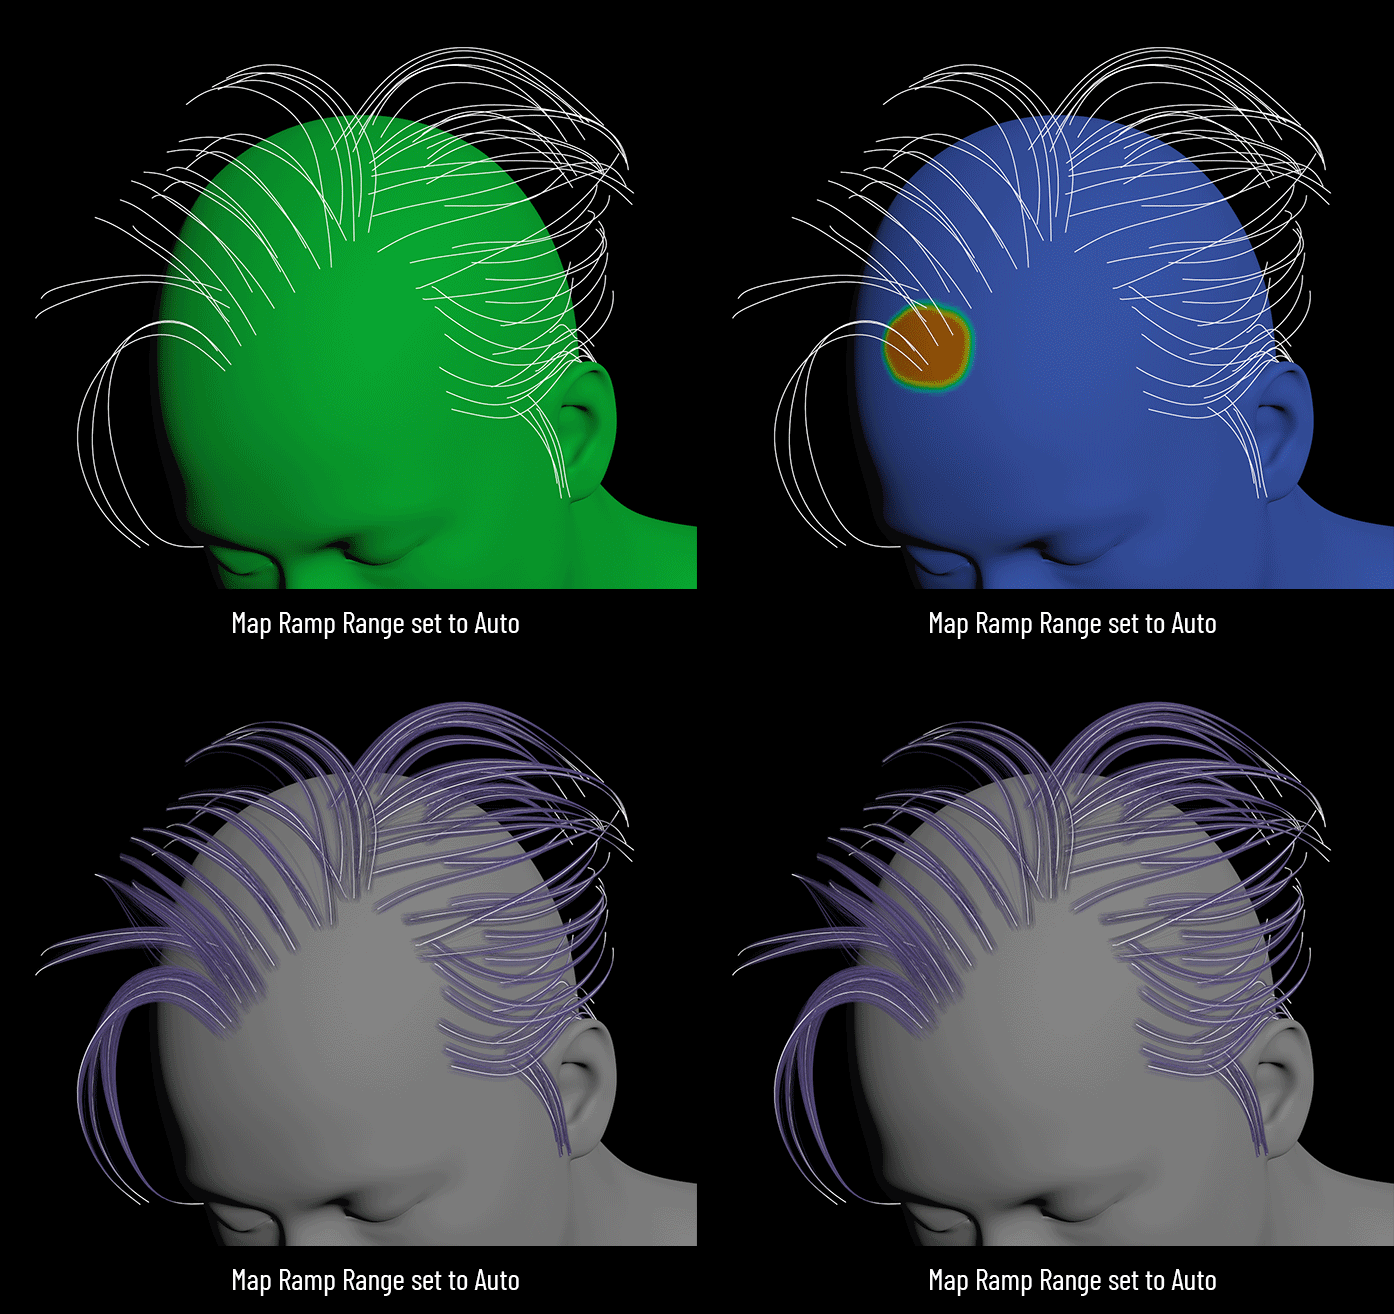
In the image above, to paint values greater than 1, I set the Ramp Range map to Auto rather than Min and Max (whose max value color is red). To make this change:
-
click the visualization icon in the right part of the Houdini workspace
-
click the pencil icon
-
set to Auto using the drop-down menu


-
SEGMENTS
Where: Hairgen Tab
Use it to adjust hair resolution (number of points).
Pay great attention to this parameter. Otherwise, you will deliver a very heavy model. Keep it as low as possible, the lowest value that lets you get the desired smoothness.
Remember that rendering engines can convert polys in NURBS surfaces and curves, so increase its value only if you have kind of curly hair.
If you want to see them smooth, drop a Resample node at the end before the Smart Viz. This way, all the nodes in the graph are calculated with a small number of points (the segment's value in the hairgen tab):

-
CLUMP LAYERING
Where: Big, Mid, Small Clumps Tabs
I organize my clumps in three layers: the big ones, which give the shape to the hairstyle; the mids that break the structure keeping the shape; and the small which give the haircut texture.
I usually start setting the small and then separating them using the mids, but it's the same if you start from the mid clumps.
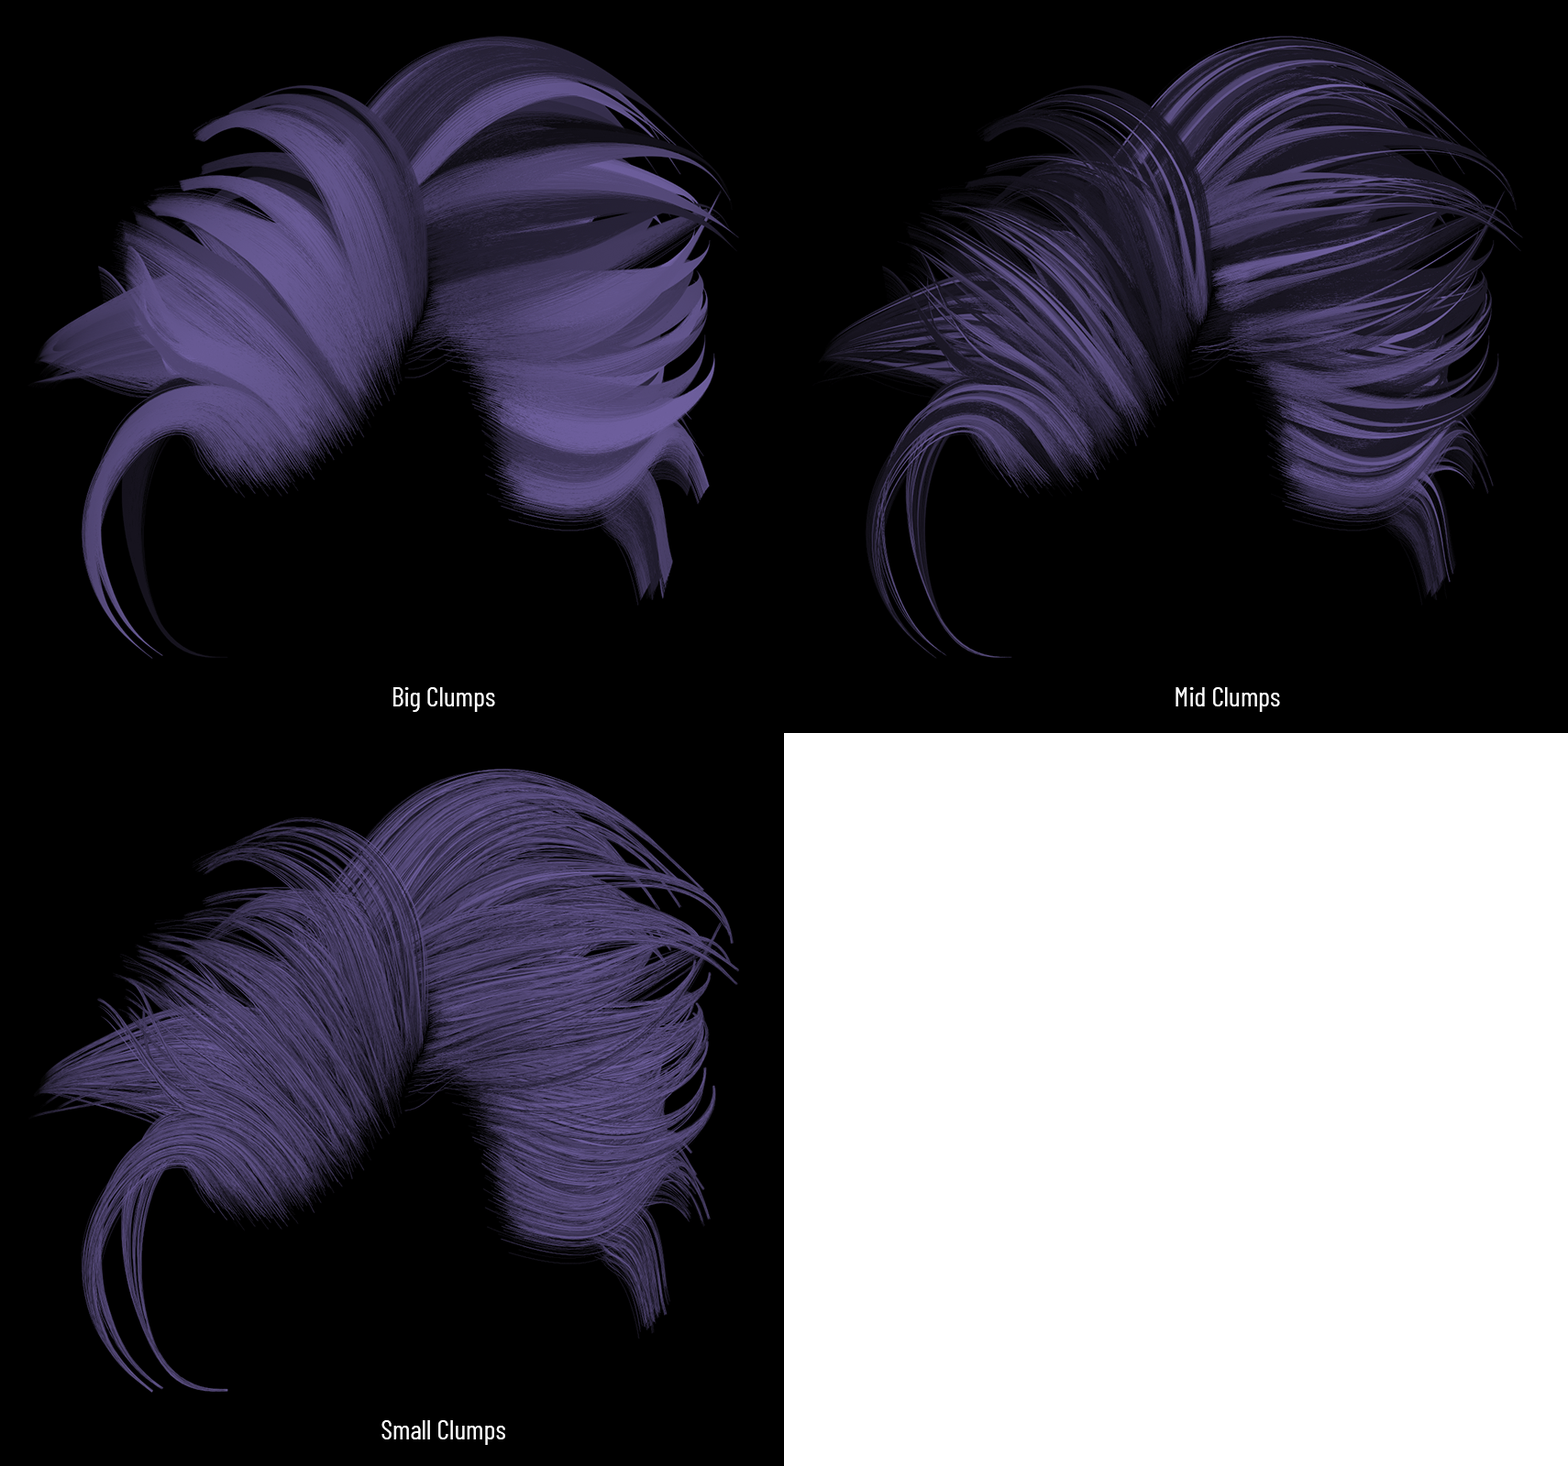
To visualize the clumps, you can use the Smart Viz options or enable them using the Rocket Grooming options, which are the same for all the clumps (big, mid, small, rebels, wet):

1 - Use this checkbox to activate (one or more) the clump/s.
2 - Use this button to turn off all the clumps except this
3 - Use this button to enable all the clumps
IMPORTANT
The Active option will not change its state when you use Only This Clump (Only Small Clumps in the image above). This is intended because it lets you evaluate that particular clump in your chosen configuration.
Forget this option/button and use the Active checkbox to control multiple clump types simultaneously.
-
REBEL CLUMPS
Where: Rebels Tab
These clumps are meant to give a little bit of messiness:
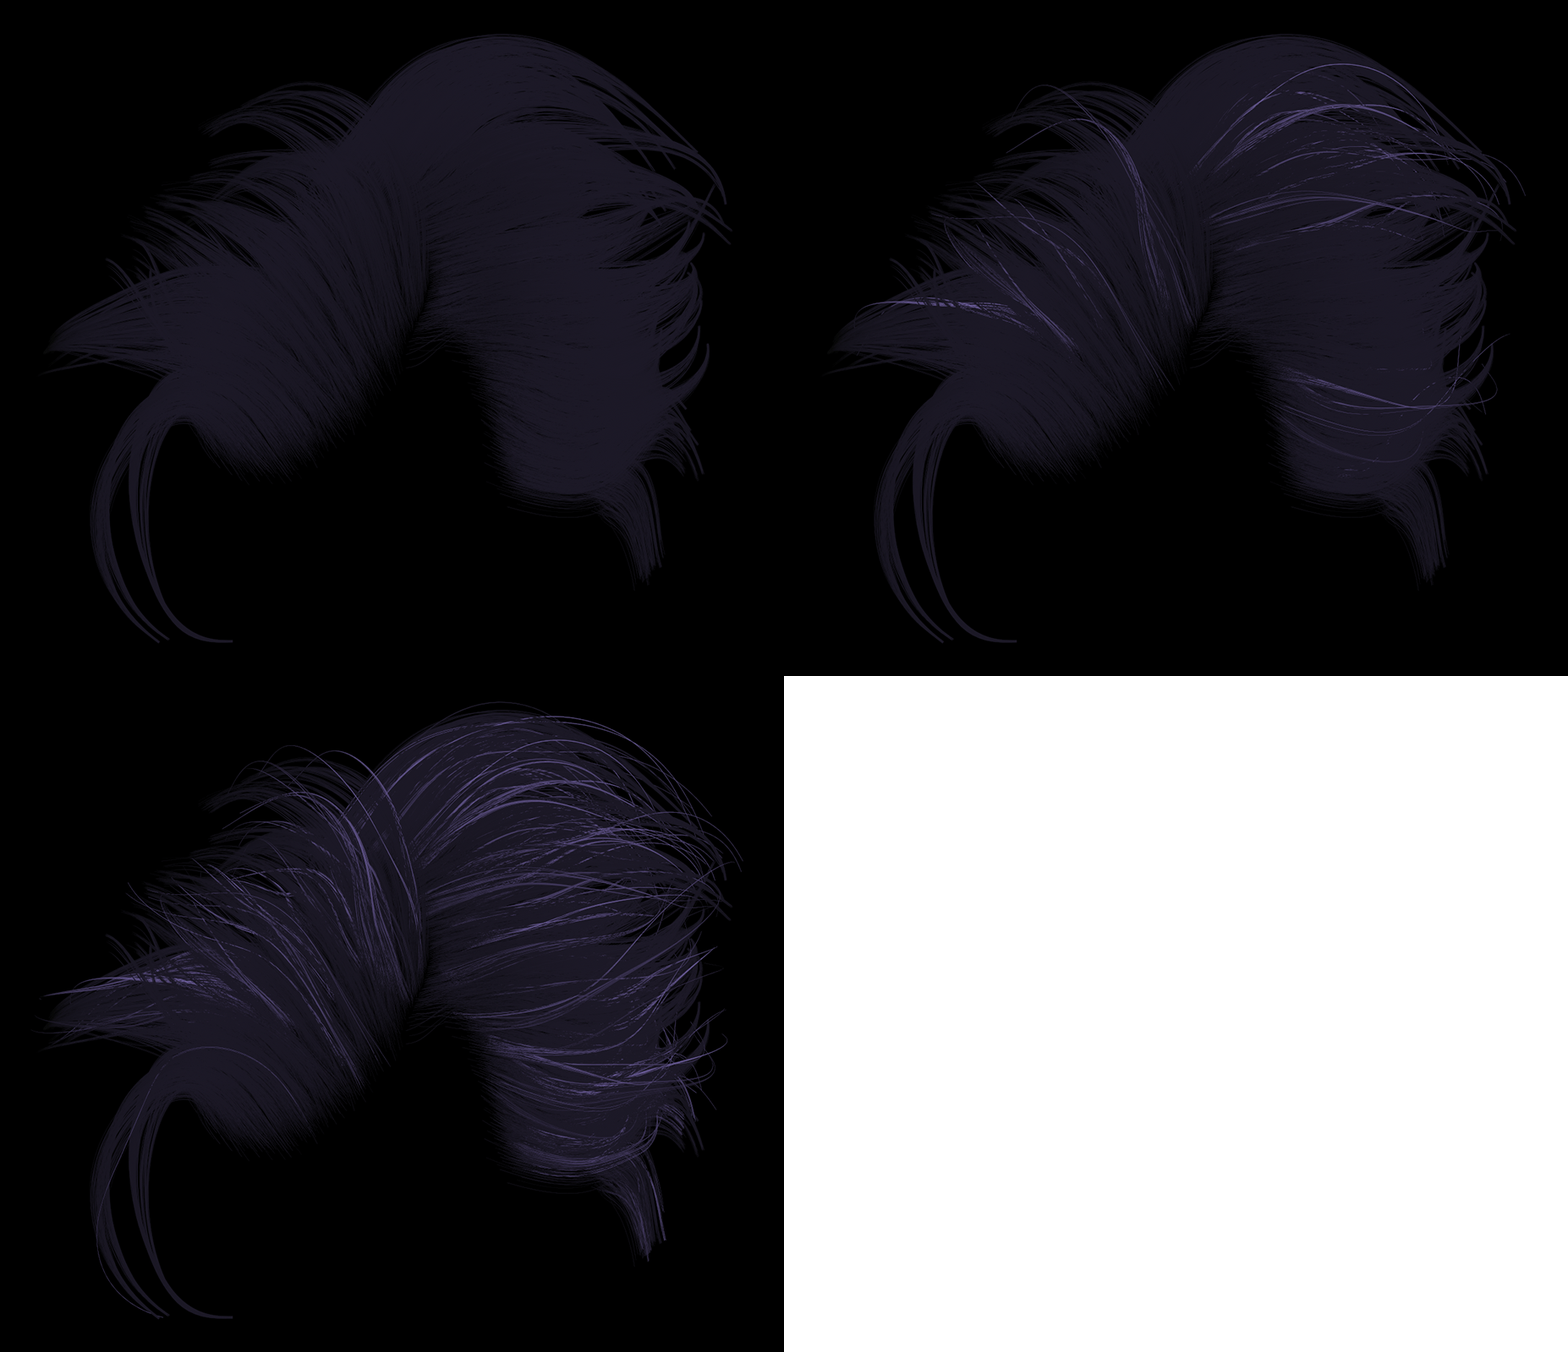
You can tweak their presence using:
-
the Amount slider
-
the Length Variation slider
-
the Blend Mask

-
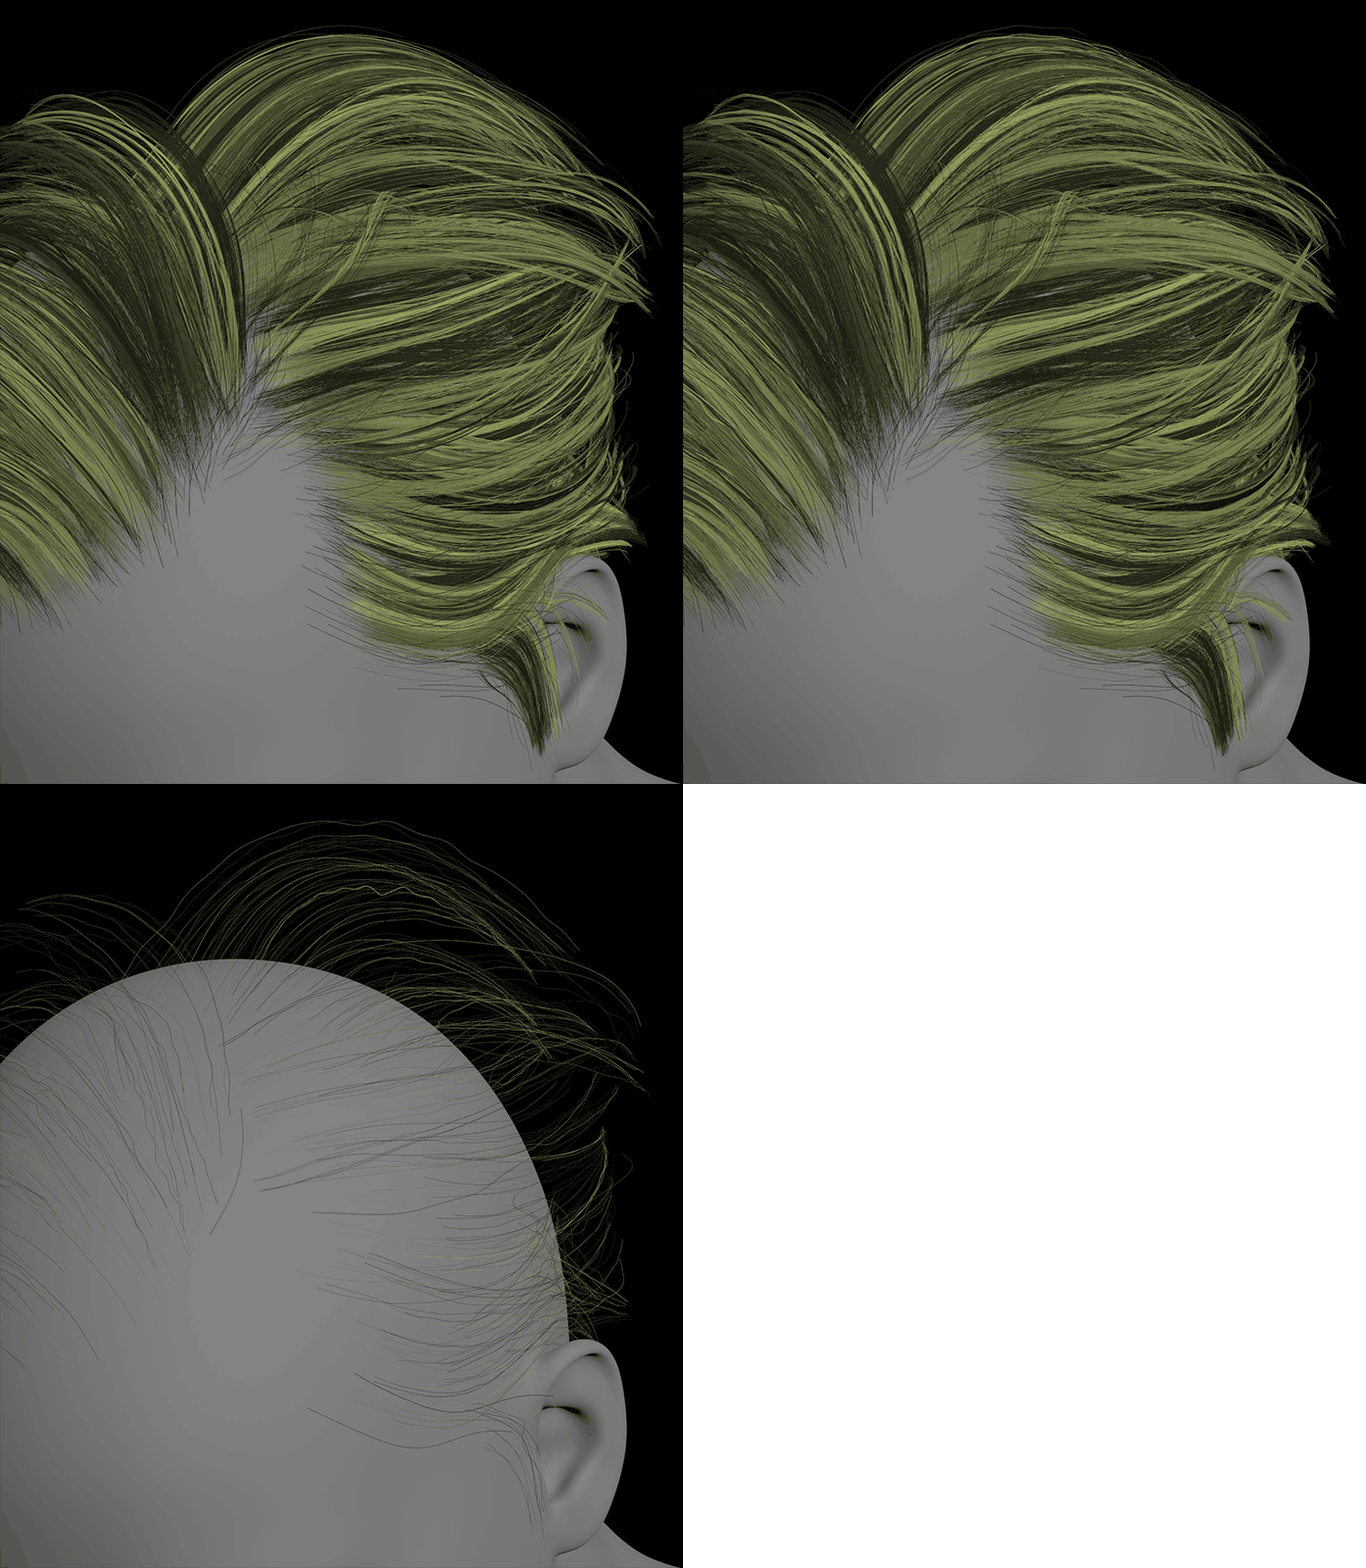
NOISE
Where: Noise Tab
Regular Frizz node. You can adjust the noise level using:
-
the Frequency slider
-
the Amplitude slider
-
the Shape curve
Using the Decimate Hair slider in the top part of the Rocket Grooming, you can better evaluate your noise settings:
-
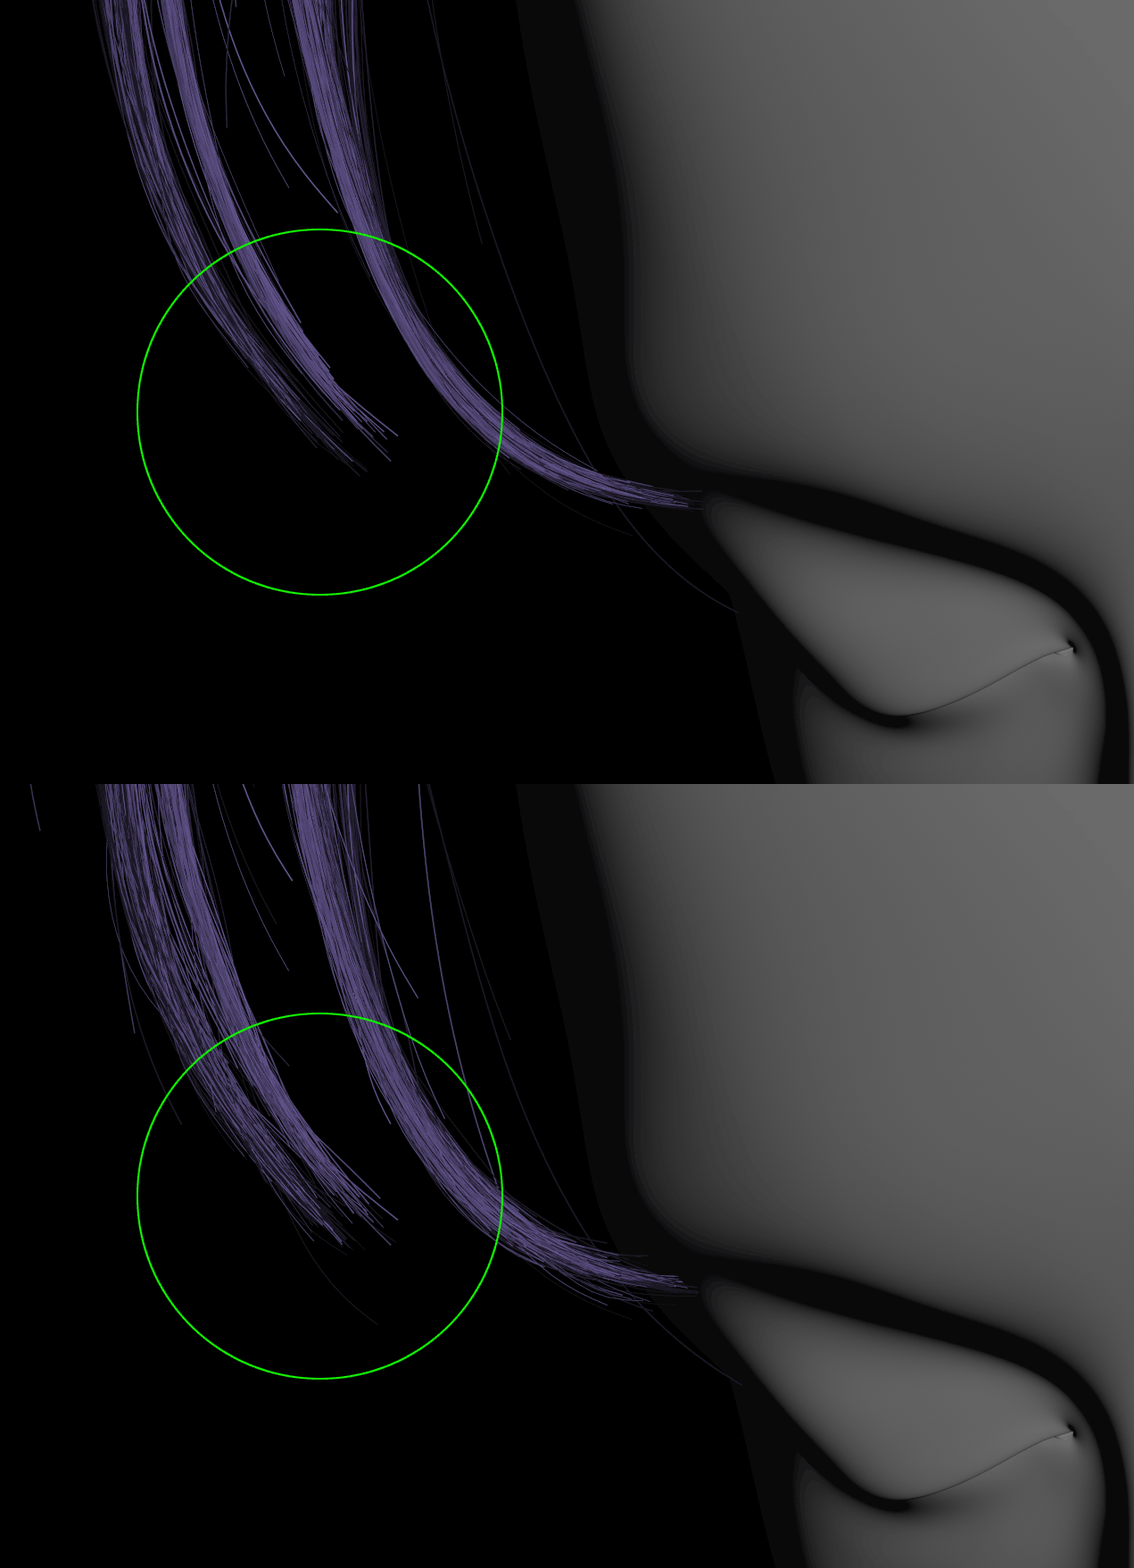
TIP NOISE
At the bottom of the tab, there is the Tip noise, which is a Frizz node affecting only the last part of the strand:
-
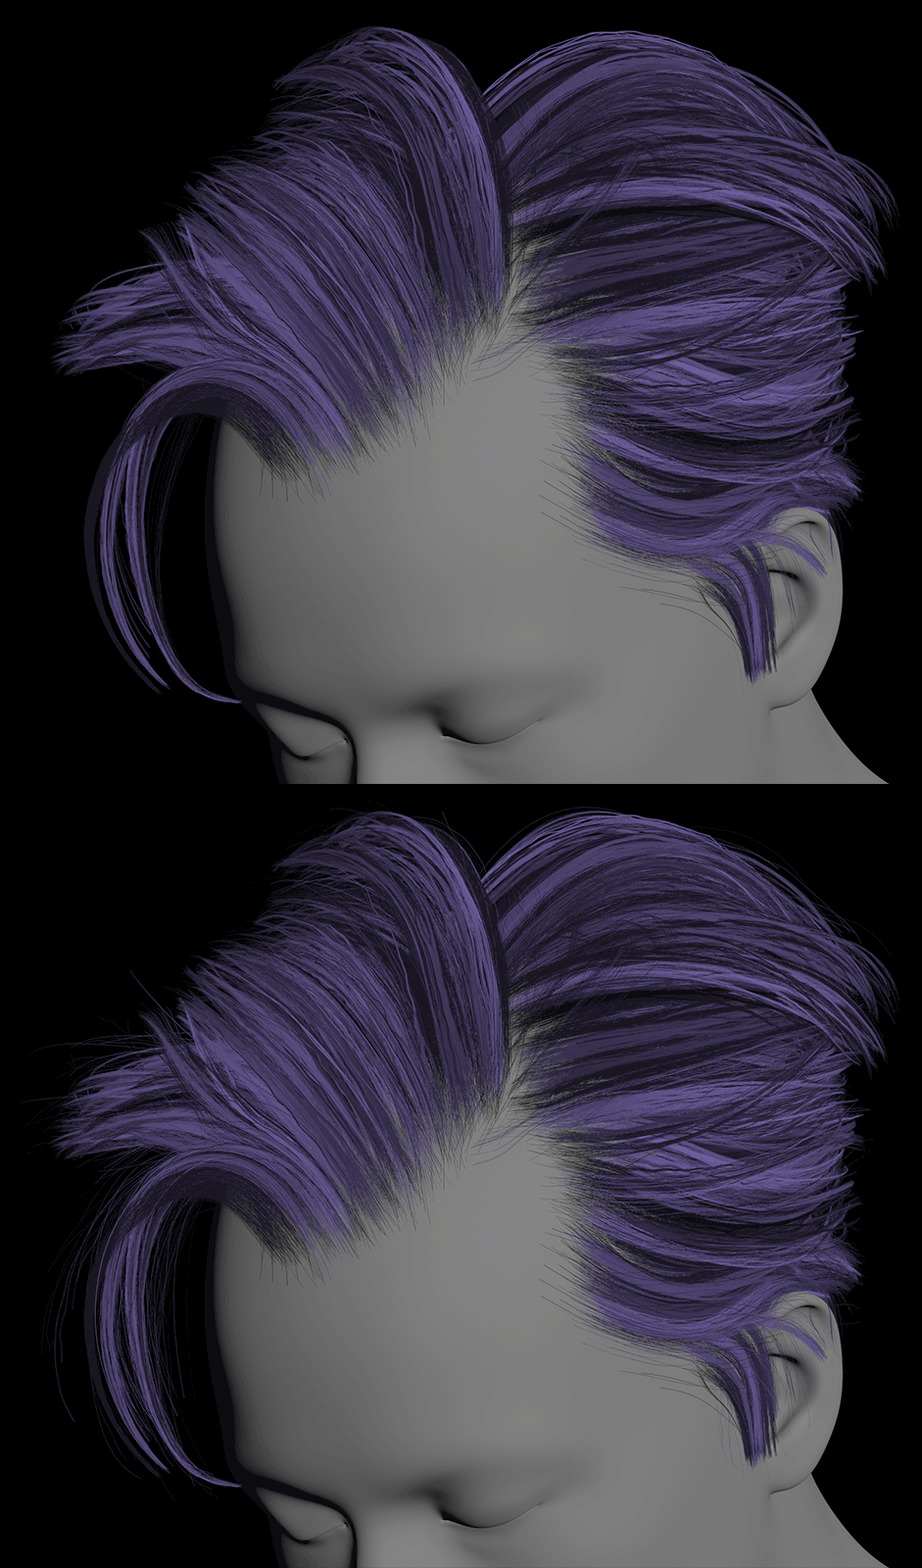
FLYAWAYS
Where: Flyaways Tab
This is what makes a grooming alive. Adding even a small amount of flyaways changes the realm of your hairstyle. The parameters exposed are:
-
Amount
-
Frequency
-
Amplitude
-
Curve ramp
-
-
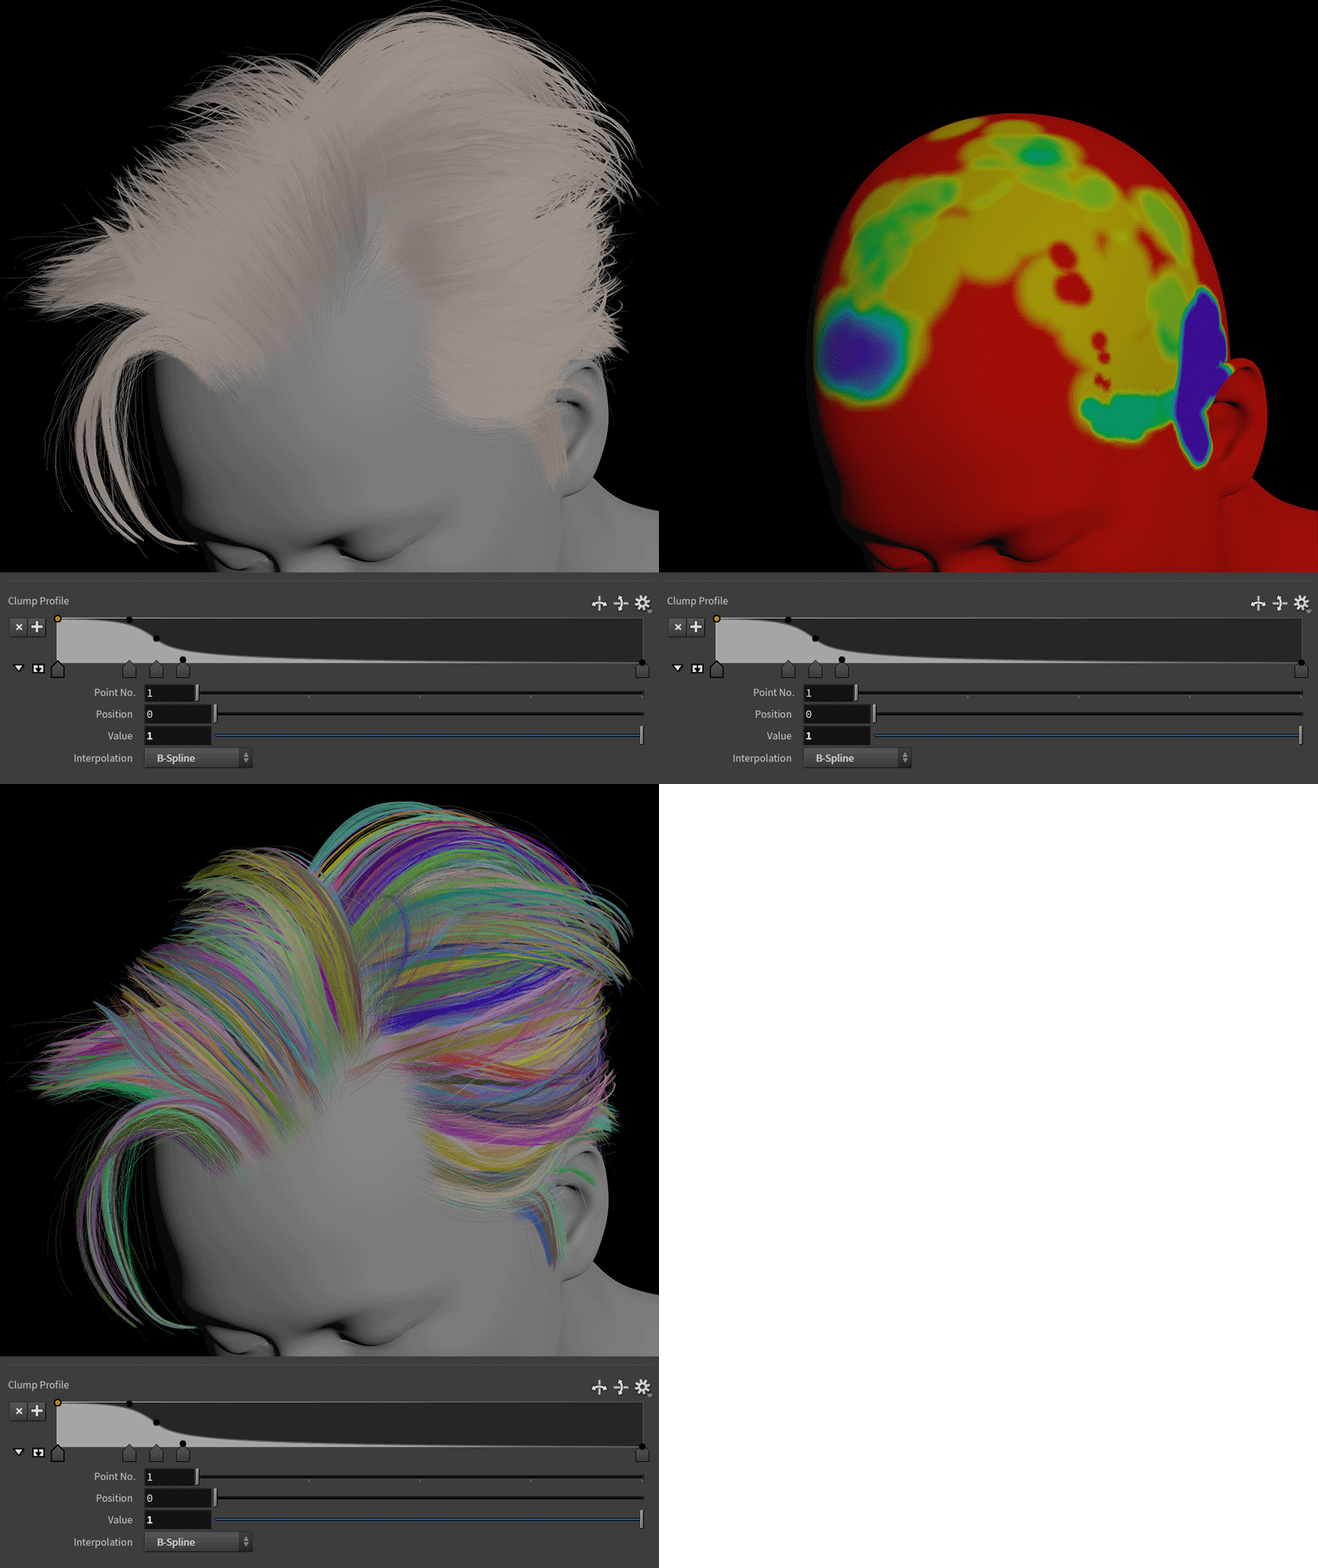
WET CLUMPS
Where: Wet Clumps Tab
This is something extra. You can use it to simulate heavy, greasy hair or that tiny bit (painting a mask) of dirtiness after touching the hair the whole day.
Not active by default.
-
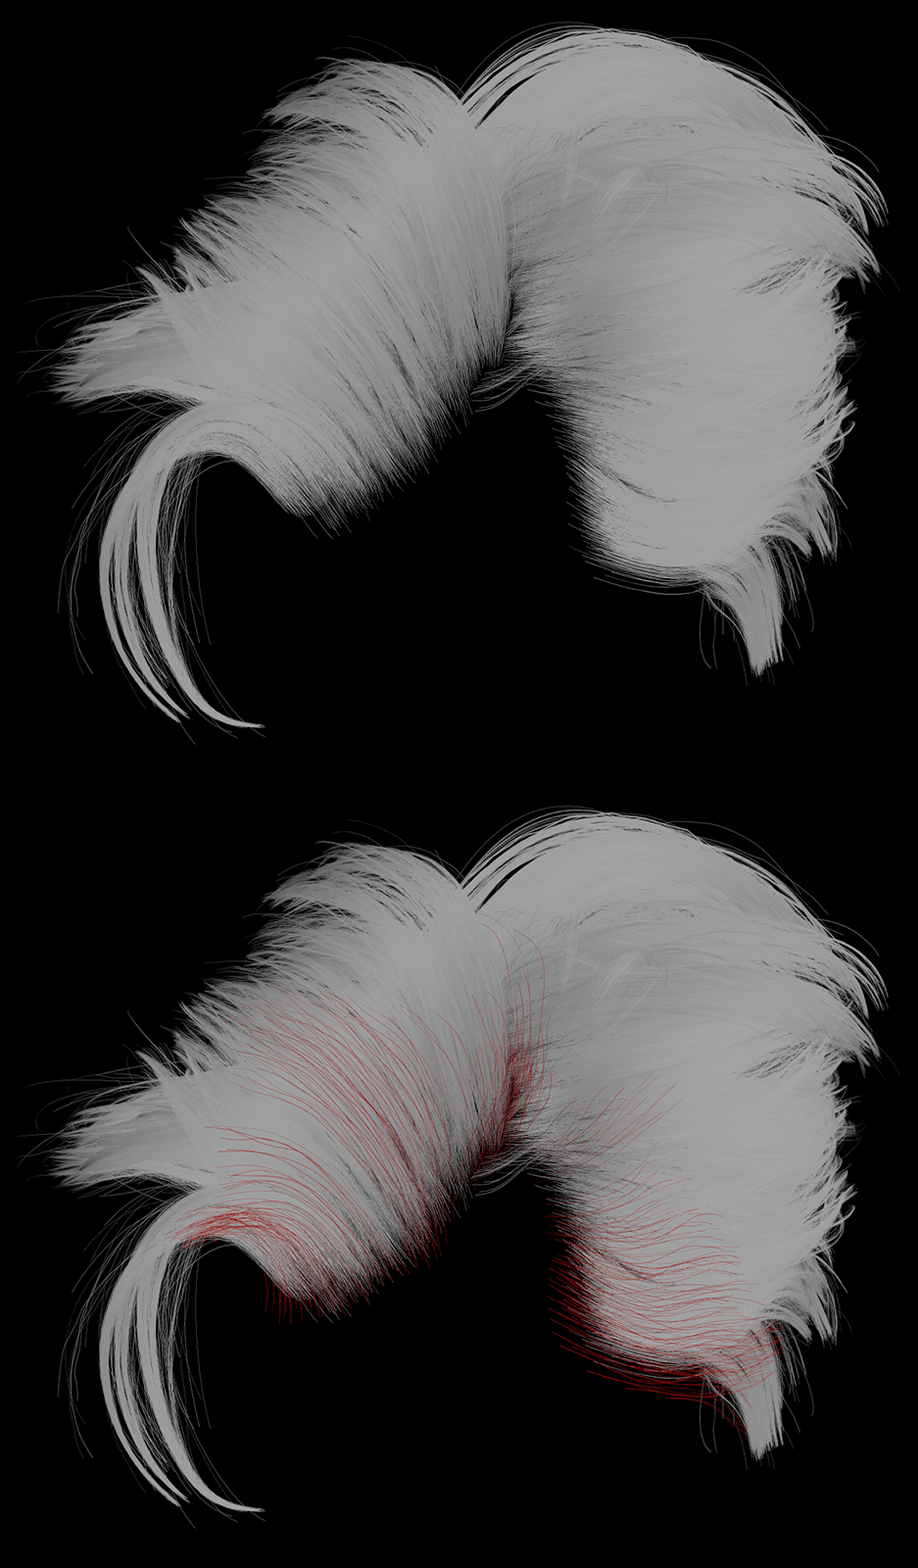
BABY HAIR
Where: Baby Hair Tab
This is another crucial part of grooming in terms of realm.
They are strands too short to be combed, so like flyaways, they are kind of rebel guys. While women fight against them, groomers love them because, like any other variation and messiness, they make the haircut more believable.

-
1 VISIBILITY
Hidden by default
-
2 USE GUIDES
You can use only the modifiers (section 5 of the image above) or feed the 4th input of Rocket Grooming with a Guide Groom node.
-
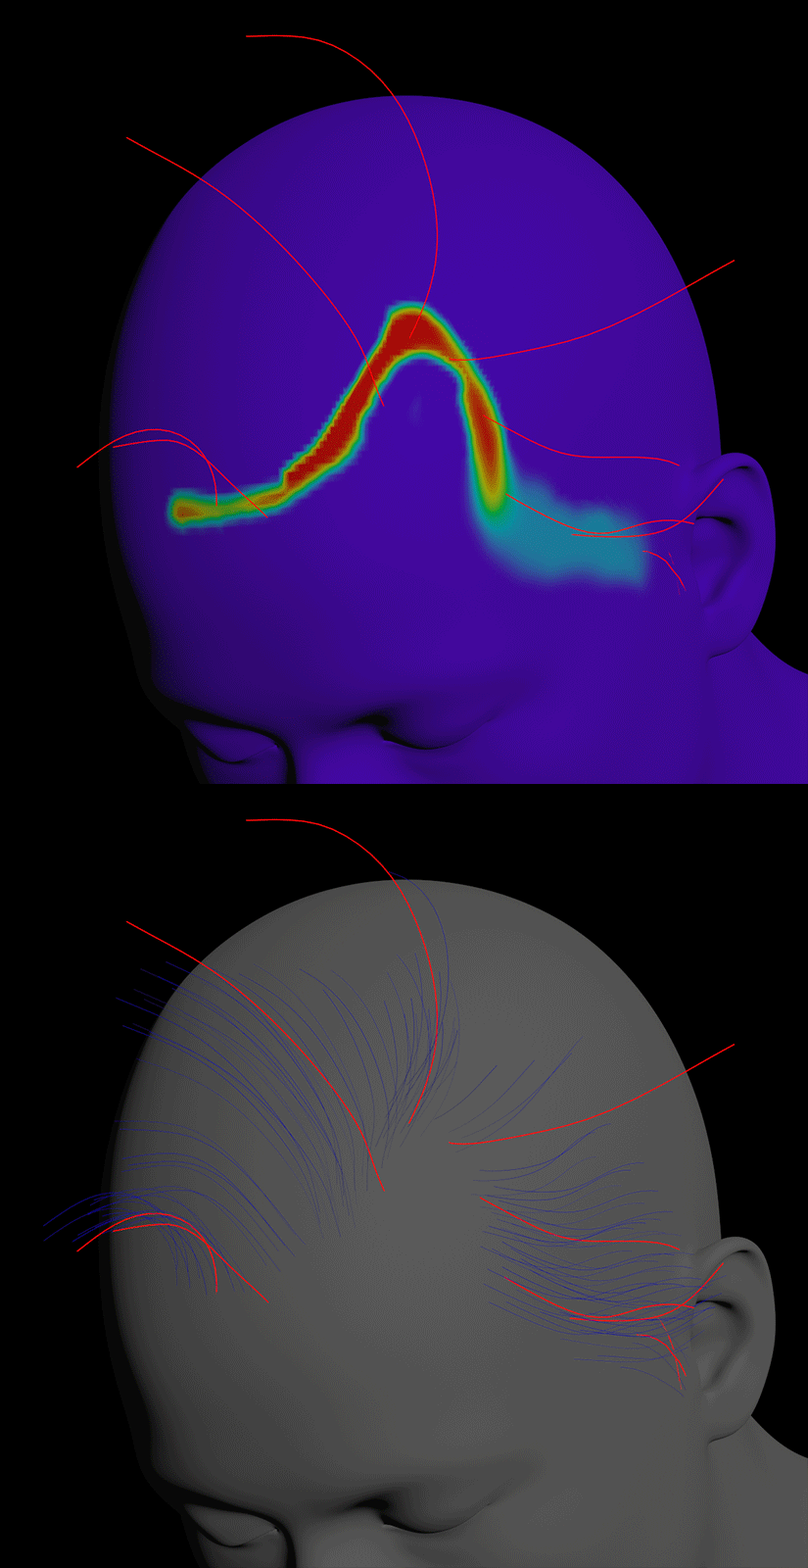
3 DENSITY
You can set the number of strands using the slider and by painting the density map
-
4 CLUMP
You can use it to drive your babies. Set it to 0 to avoid any effect.
-
5 MODIFIERS
Length (you can paint a map), Noise and Bend.
-
PARTING LINE
Where: Parting Line Tab
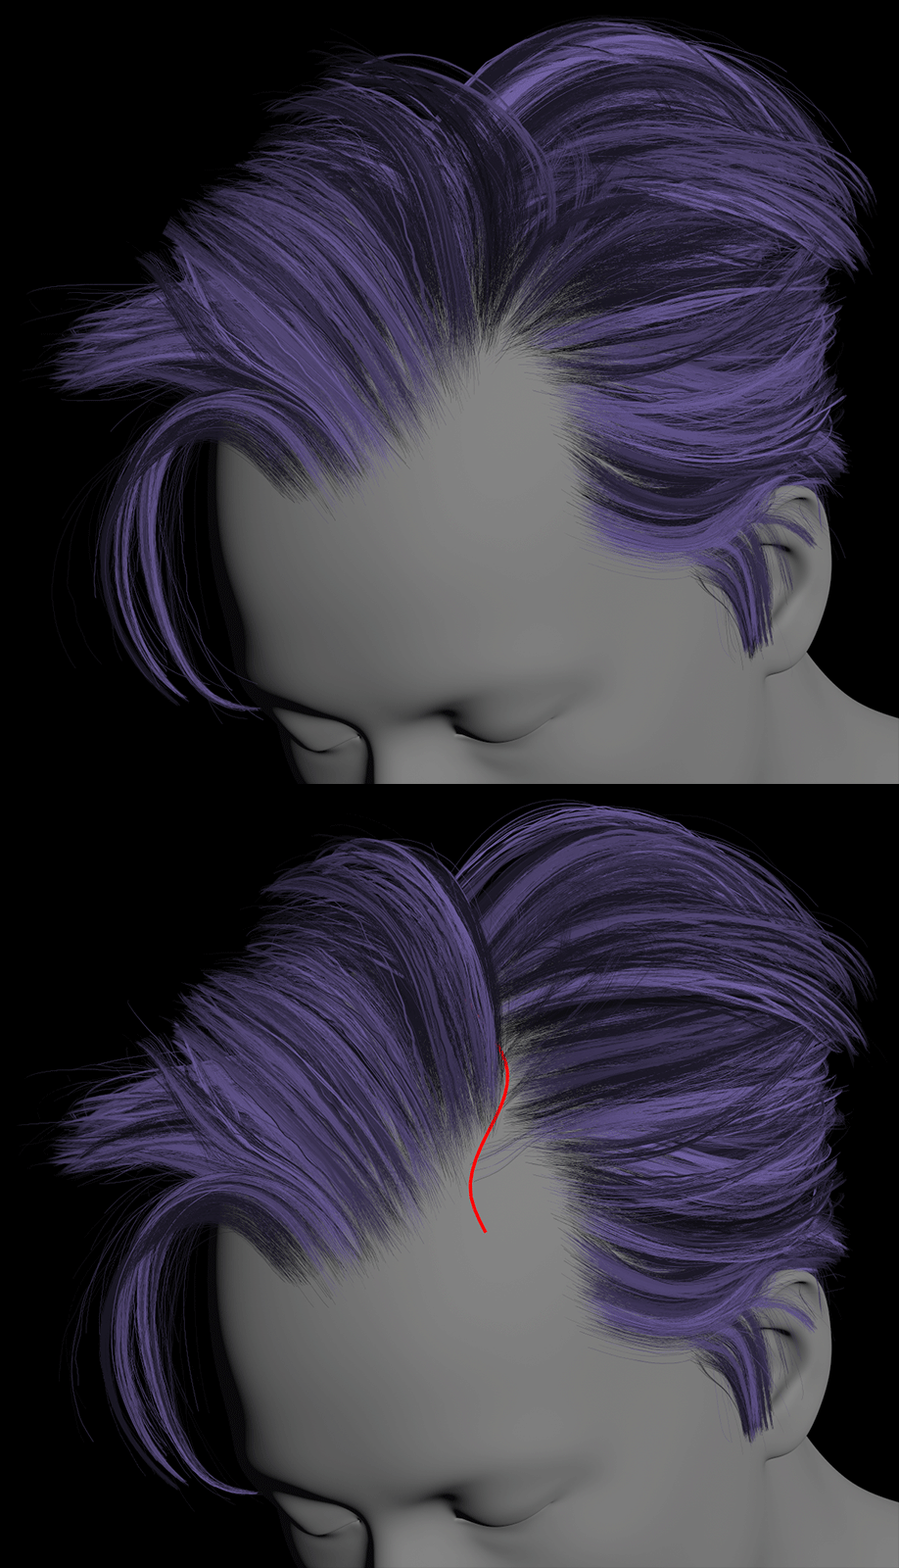
Feed the last input of Rocket Grooming with a Guide Groom node where you drew the parting line/s.
Remember that parting lines are used to avoid hair interpolation between hair parts going in different directions. So, use them to have clean lines separating two parts of hair or separate and organize different parts of your haircut:
CONCLUSIONS
Once again, this is a straightforward but effective tool that can help to speed up your work.
In my tutorial "Grooming theory and practice," you can learn how to modify the hda and use my other technique to sculpt your guides easily.
Now, let's see what Smart Viz can do.
SMART VIZ
OVERVIEW
This is an evolving tool I started to build some time ago. Like Rocket Grooming, it was initially a simple tool whose goal was to visualize the hair in the viewport. Work after work, I tuned it, adding new parts, and now it's very effective, at least for my needs.
This is the GUI:

HAIR VIZ
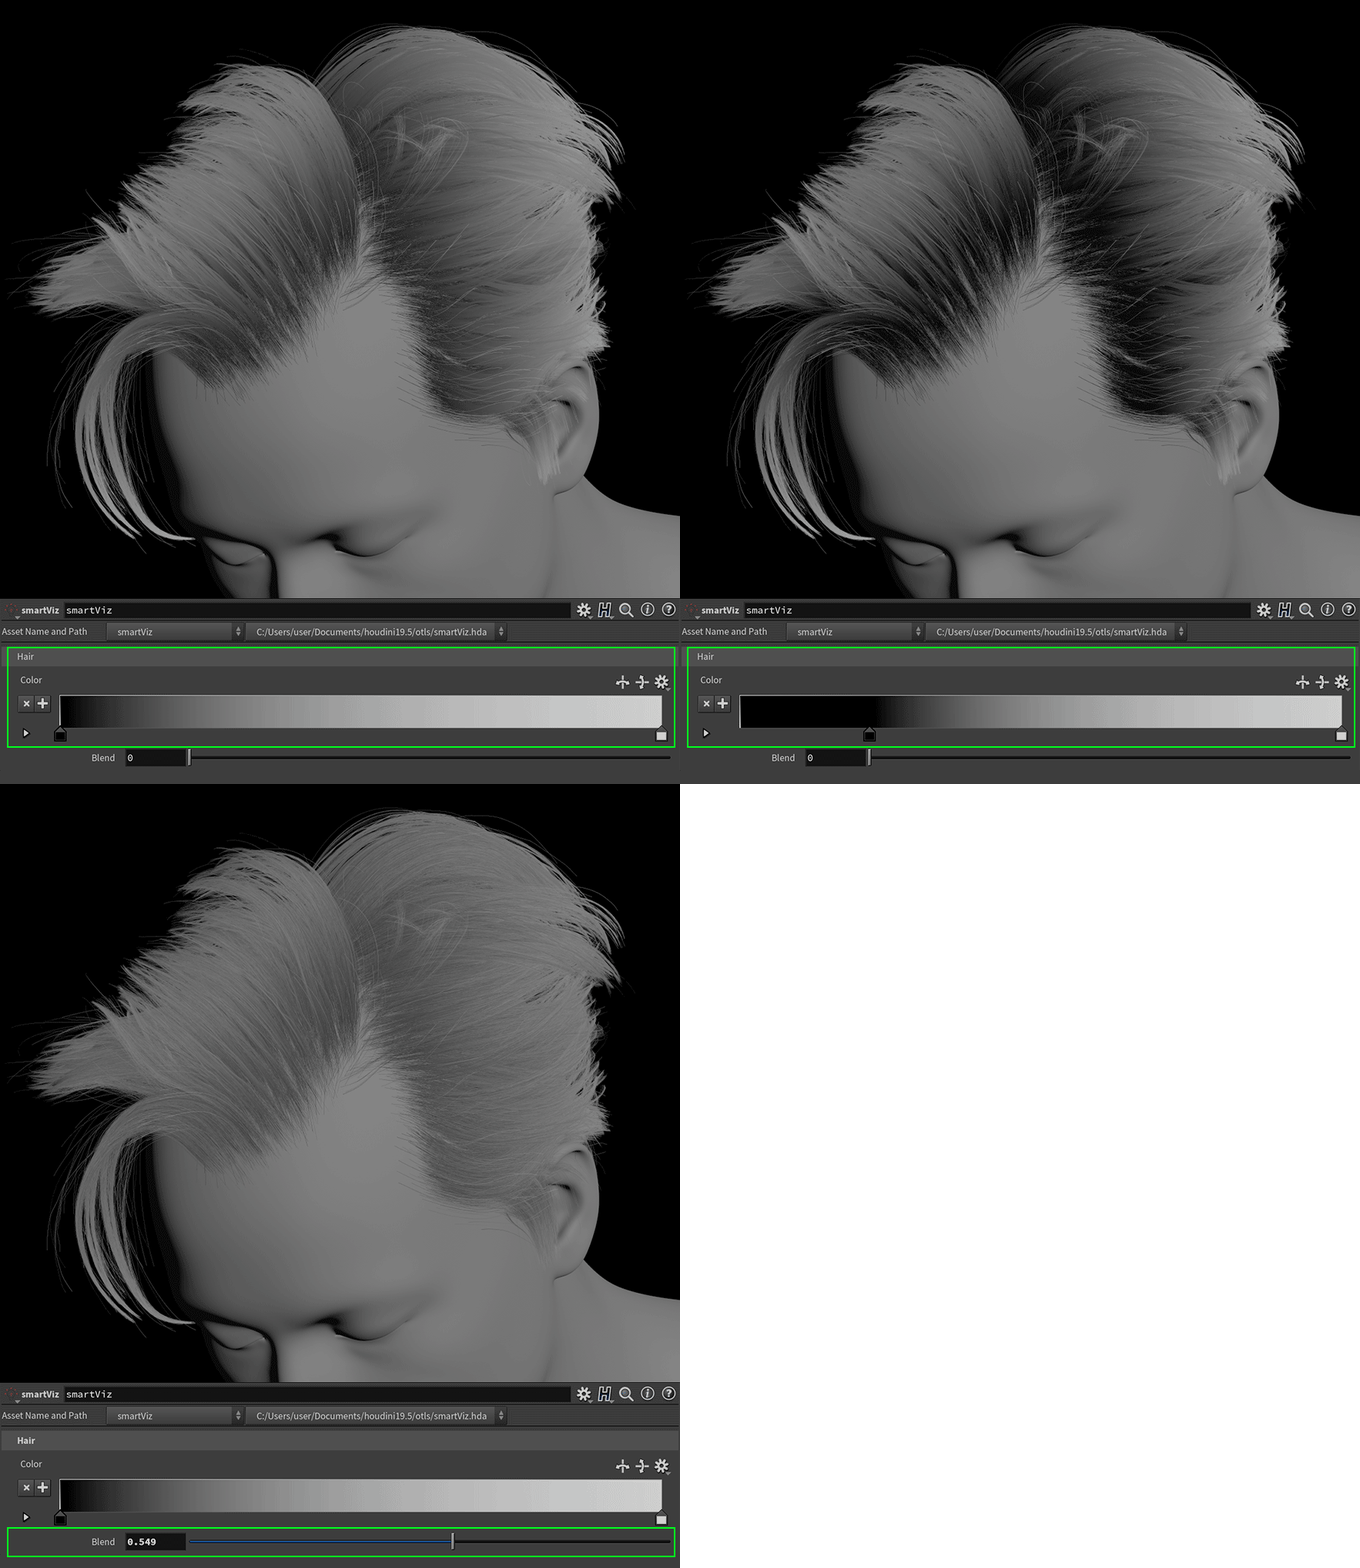
The top part uses a gradient (driven by the curveu attribute) that can be blended with a grayscale made by random values. This is important when you want to see the strands in detail, starting from the root, keeping a distinctive visualization of each element:
CLUMP VIZ
The bottom part uses the clumpid attribute to visualize the different clumps. To make this happen, you have to assign a distinctive name for each clump node in the Attributes tab:

Now, using the Attribute drop-down menu, after checking Use Me, you can choose which one to visualize:

In the above image, I highlighted the clump attributes, but you can visualize other attributes as well.
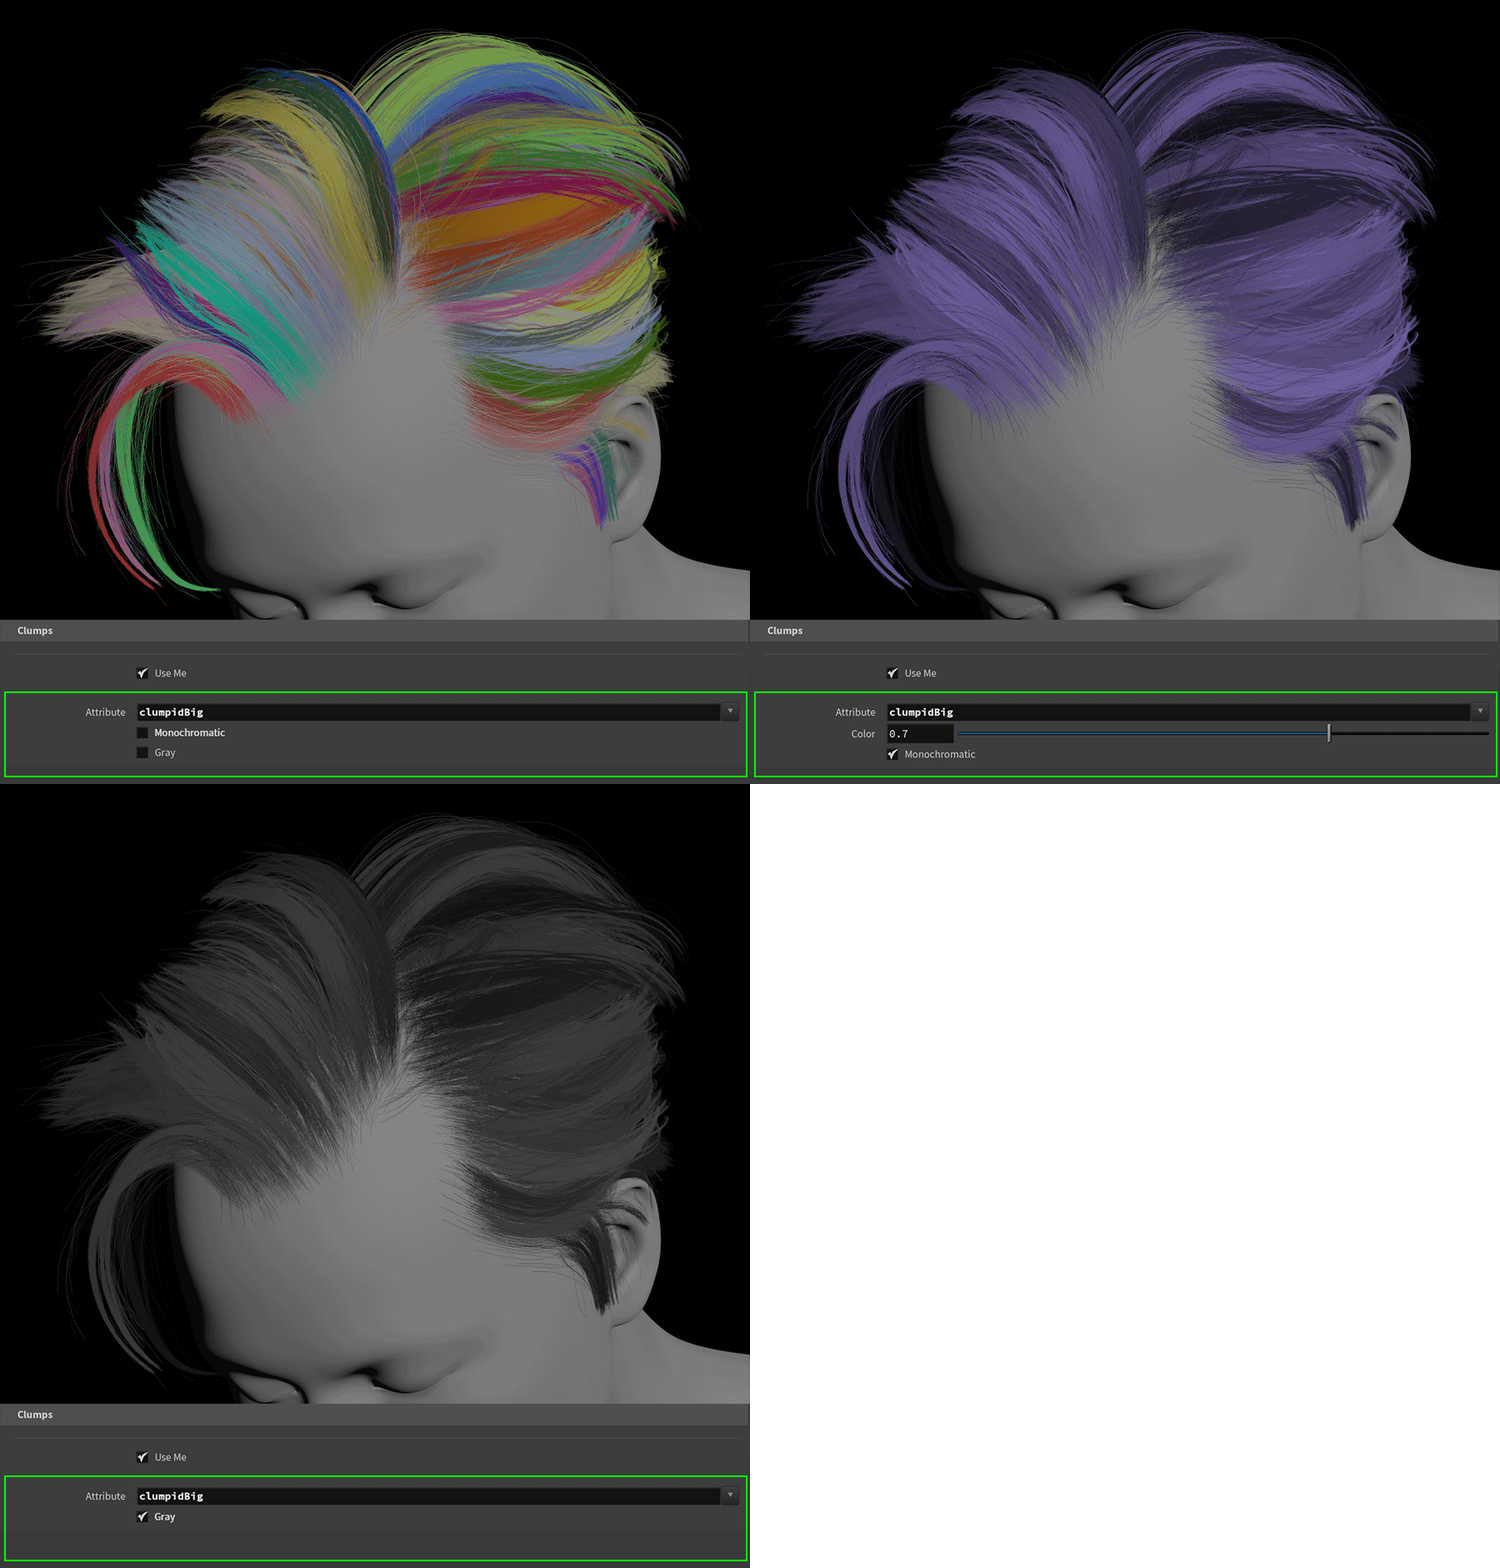
Here you can see the other visualization options: random color, monochromatic, gray:
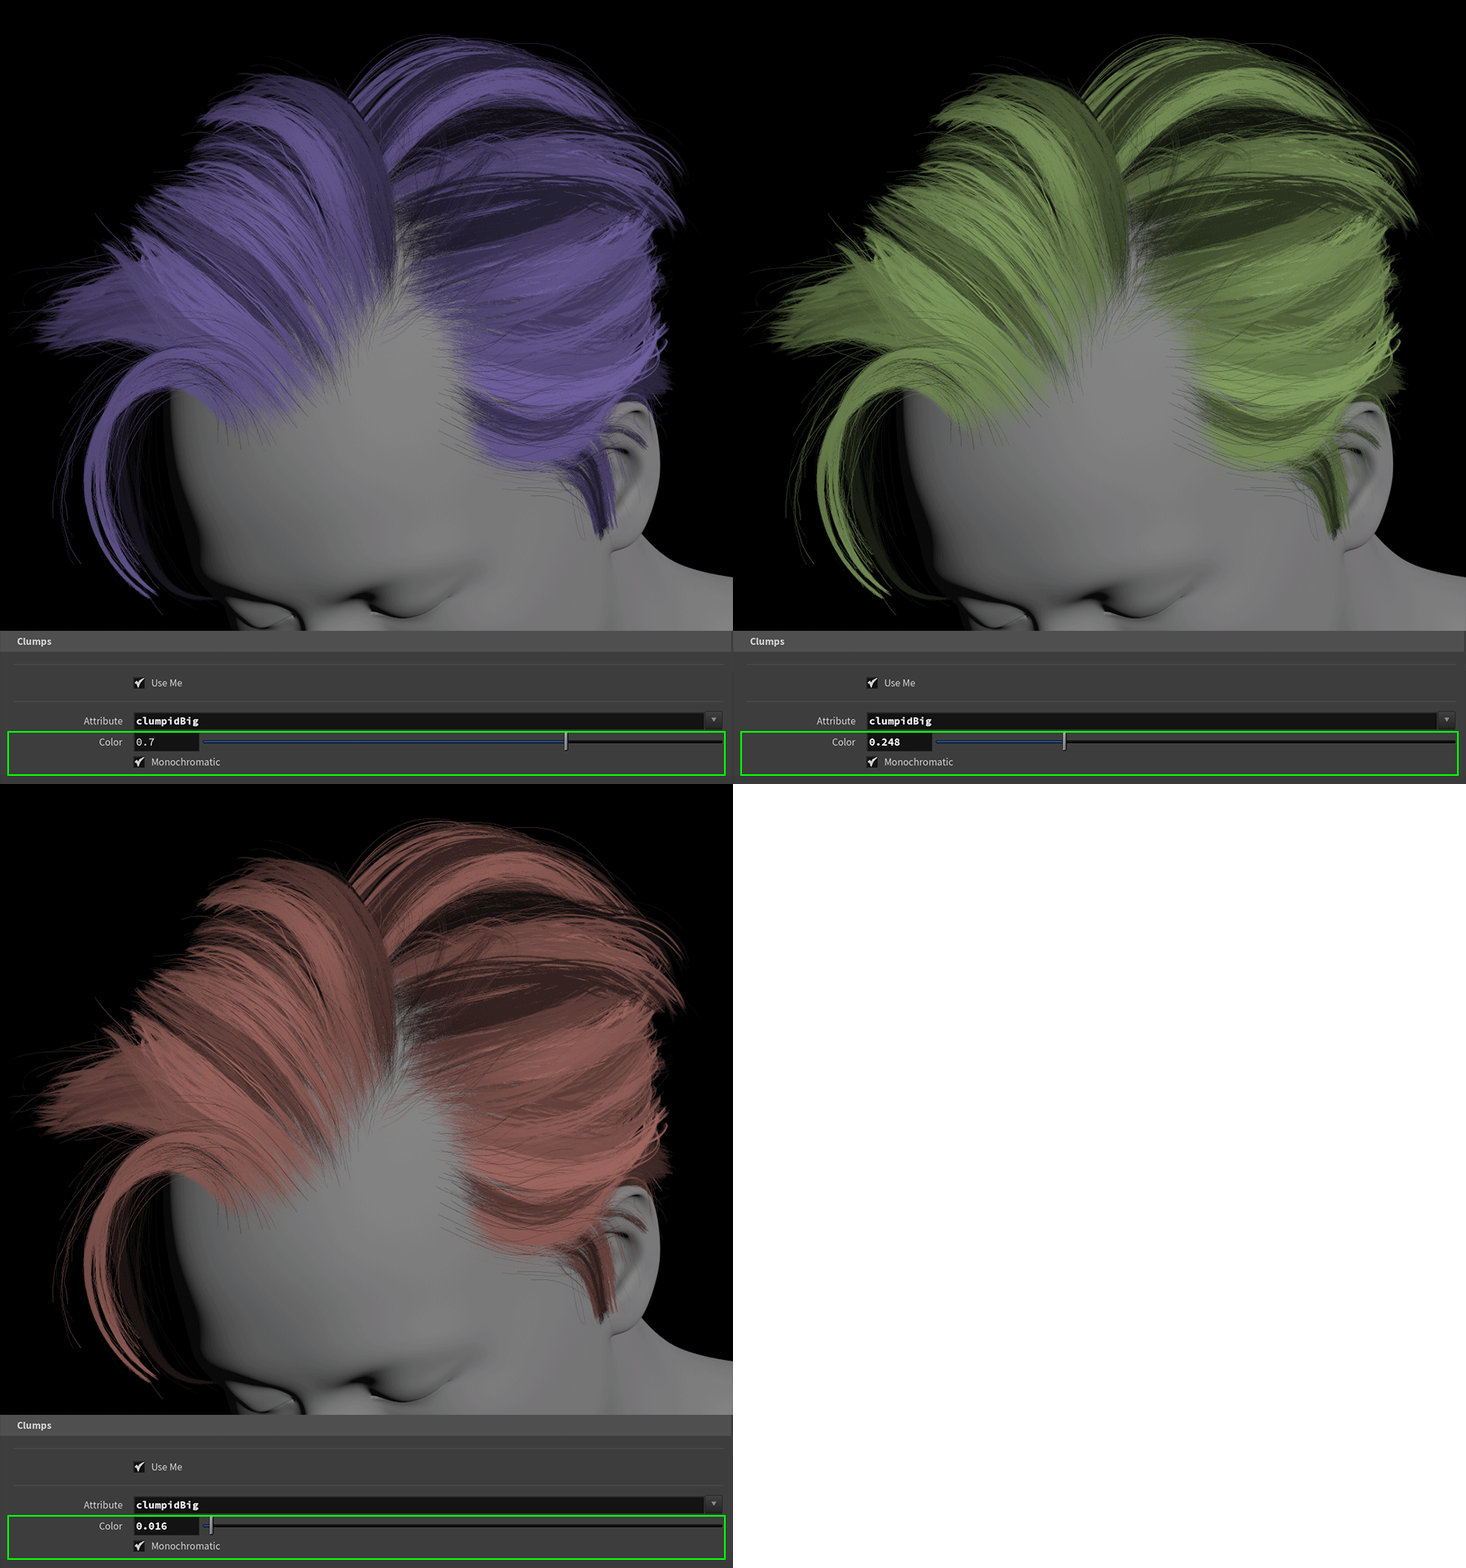
Using the Monochromatic option, you can choose the visualization color (this field/slider is visible only if you check this option):
CONCLUSIONS
I hope these tools can help you in your daily job. Unlock, see what's under the hood, and tune them to your needs.
Sharing knowledge is very important. Writing a tutorial helps you go through the process and understand it in its nitty gritty. Do the same and share with the community!
