After 10 years of shooting, editing and grading I decided that color correction should have been my main job.
During all these years I attended online and in presence courses with pro colorsists to be sure to become a pro myself.
I mainly use DaVinci resolve with a surface control and 10 bit calibrated monitors. I'm based in Italy but used to travel for job.
Ehilà Luca,
questo l'aggiornamento di oggi.
Anzitutto il mirror tool funziona magnificamente e questo ci permette, a costo zero, di avere il doppio delle variazioni (anche se magari non così significative). Non sono riuscito a far funzionare un "button" nell'interfaccia del controller (mi dirai come associare lo scrit da eseguire), per cui ho messo un integer 0/1:
INTRODUCTION
During my last Summer holidays, I spent some time to write this tutorial to share what I learned during almost two years of research and development.
Grooming is a challenging task. There are billions of haircuts, and trusting only your references sometimes is not enough. The more you know about hair and hairstyles, the better your results will be.
Knowing how hairdressers work is crucial if you want your grooming to be realistic, especially if you will simulate the hair. This tutorial aims to mimic real-world procedures using 3D grooming tools. It's a quick guide where you can find many production tips to speed up your work and keep things well organized.
Using this method, you will easily groom any hairstyle.


To better follow the tutorial, you can download a simple scene withe the base graph here:
HDA UPDATE
DViz is the old version used in the tutorial. GroomViz is the latest one.
GroomViz has only one input (guides). To visualize selected and non-selected guides, you have to copy the Guide Groom Group field selection (right click > Copy Parameter):

into its Group field selection (right click > Paste Relative References)

Here you can download both of them:
Using this menu, you can easily go through it as many times as you want:
Let's dive in
HAIR
Thickness and amount
"Hair with a small diameter—or fine hair—has a typical diameter of about 50 microns," Spengler explains. "Hair with a larger diameter—or coarse hair—has a typical diameter of about 120 microns."
For comparison's sake, a piece of copy paper is 70 microns thick."
"Those with thin hair might have about 80,000 fibers on their head, and an individual with thick hair will have about 150,000 fibers," Spengler says. "The greater the number of fibers, the greater the interaction between each fiber." In other words, dense hair usually looks and feels fuller than thin hair."
Extract from Byrdie.com
But thickness and number vary within the scalp, too. For this reason is important that you add a couple of nodes at the bottom of your graph (so Houdini calculates this only at the end) that do the job.
If you are a nerd, you can use vex to do this. If you are not, like me, you can use an "Attribute Randomize" to randomly change the hair strand width.
But @width is a "point attribute", which means that the variation is per point:


click to enlarge
So, to get it to work on primitives (the hair strands), you have to "promote" this attribute:

click to enlarge
Now you can add the "Attribute Randomize" node to vary hair strand width:


click to enlarge
Now, the tapering, since the tip is thinner than the root. To do this, you can use the "curveu" attribute (which goes from 0 to 1 along the curve) and times it with the width attribute.
Since curveu is a point attribute, we have to bring the width attribute to its point attribute nature using an "attribute promote" node (as you did before). After that, using some very simple vex, you can get a realistic hair strand:

click to enlarge
In the first line, I invert the curveu direction (since it is 0 at the root and 1 at the tip), and in the second line, I time it with the width.
The value I add at the end is extremely important. Since the lowest curveu value is 0, if I did not add it, I would get a curve ending in nothing. And this is not what happens in reality. Hair gets thinner, but never a 0 value:

click to enlarge
Variation is very important, and you have to use it for as many parameters as you can. Each strand is different in shape and color, and keeping this in mind makes the difference.
SCALP ZONES
The scalp is the common word used for the head area where hair grows and it is subdivided into different zones:

click to enlarge
Actually, things are a little bit complex, and you could divide the scalp more precisely:


HAIRLINE
Hairline is the word used to identify the front part of the scalp, it has different shapes, and changes a little bit from men to women:


click to enlarge
BALDNESS
As time goes by, hairline, especially in men, varies considerably. The Norwood scale is the reference for this change:

Baldness can be a good ally for your groomers, and you can quickly get many variations. This could be useful for B characters, for example, or if you want to have an elder version of your hero:

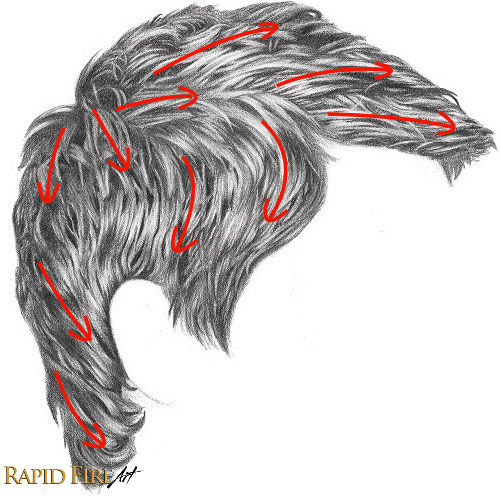
GROWING DIRECTION
Another critical aspect to take into consideration is how hair grows. This is especially important in short and mid-haircuts. Once again, the references help you, but having this knowledge is essential.
The most critical point in terms of direction is the crown:

HAIRSTYLES: MACRO CATEGORIES
Even if there are billions of haircuts, they can be divided into 4 categories:

BUZZ CUT

PIXIE

BOB CUT

MID - LONG
As you can notice, the main difference is the length of the scalp zones.
ELEVATION AND CUTTING ANGLE

click to enlarge
Elevation determines if the hairstyle is:
-
LAYERED
-
GRADUATED
-
BLUNT (one length)
If you elevate the hair from 90° to 180° and you cut it, the bottom strands are longer than the above ones, and once they reach the rest position, the volume decreases:

click to enlarge

click to enlarge

click to enlarge
Opposite, from 90° to 0°, the volume increases (maximum at 0°):

click to enlarge
click to enlarge

So, as you can see, working with scalp zones and elevation lets you create any kind of hairstyle. Not convinced? Let's see how real hairstylists work.
HAIRCUT PLANNING
If you had the chance to look at those hairdresser magazines, you probably noticed the haircutting diagrams. They are a visual project hairstylists use to explain how they get the result.
Hairtech is an app that helps hairdressers do the job:

click to enlarge
As you notice from these diagrams, the elements that build the haircut are elevation, cut angle, and scalp zones. Other than that, you can see multiple lines inside each scalp zone. They identify the sections, something we don't need to consider for now.
Before approaching the tech part in Houdini, please have a look at this video:

HOUDINI
Now it's time to see how we can approach all this in Houdini.
The first task is to build the scalp and subdivide it. You can do it in different ways. I decided to use a method that I can use on multiple heads without starting from scratch every time.
Let's dive in.
SCALP CREATION

After importing the head, I subdivided it (to have more resolution), and I painted the hairline, which I will use as a guide for the scalp mesh and, later, as a growing region (for guides and hair).
Then, using TopoBuild, I first built one side of the skull, mirrored it, and finally used a Fuse node to have one single piece of geometry:
Now it's time to subdivide the scalp:


I used a Group Create node and a Color node after that (I could have used a Name node, but this way is more clear):

click to enlarge
If you want not to have so many nodes in your graph, you can collapse them into a subnet:

GUIDES
Time to add the guides. Simply use a Hairgen node and connect its first input (skin) with the output of the last color node. Use Total Count for the amount of the guides and Relax Iterations to evenly distribute them:


Now, we need a tool to adjust each zone length. We can use a Length (Guide Process) node for each group - zone we created. But before that, we have to transfer the groups from the skin (we selected polys) to the guides using a Group Transfer node:

NODE ANATOMY
At this point, it is worth to spend some time speaking about the anatomy of the node. We use them all day, but, especially we artists, do not pay attention to what is inside them.
I'd like to handle it now to explain why we need to transfer groups.

To access this window, go over the node and click the "i" icon on the left. To stick it, click the pin on the left top corner.
The important info is those inside the red rectangles: number of Points, Primitives and Polygons, Point Attributes, and Primitive attributes.
As you have noticed, no groups are listed. But we created them, so where did they go?
They are there, but we are looking in the wrong place since the info window relates to the first output of the node.
To see the other outputs info, connect a Null to it and, like before, go over it and click the "i" icon:

This time, we are considering the skin output; in fact, the groups are there, and all the other parameters are updated.
Now, the point is that we need to transfer them to the guides because we want to change their length. To do this we can use a Group Transfer node:

Now, groups are in the right place and you can control each zone length:

HDA
But you can go a step forward.
To quickly adjust the length, you can transform your "Length node chain" into one hda. This way, you can concentrate all the sliders into one single node:

Hda is a crucial feature of Houdini, and it can speed up your work. You can learn how to create them by watching this video:

GROOMING
It's time to see how all this works inside Houdini and why I could be useful using this approach.
Have a look at this image:

click to enlarge
As you can see, when you change topology, you have to paint your scalp subdivision from scratch, while the mesh one adapts quite perfectly to the new geo.
Only a small fix you can do moving the points in the Topo Build node:


To match the new head, you have to add a Ray node after the Scalp zone Subnet node (where you created the zones by selecting the polys). Set its method to Minimum Distance and feed the second input (Collision Primitives) with the "new head" (the one you will groom). If you subdivided the head (to paint the hairline, add a Subdivision node before the Ray):


USING A SINGLE NODE
Before starting the guide sculpting, let me show an essential thing.
As you can see from the scene you downloaded, I'm working inside just one node:


If you are new to Houdini grooming, maybe you start your scene by adding, at the root level, the Guide Groom node and the Hairgen node using the Add Fur icon on the shelf:


This is the way we all started, and sometimes, the way we use it. But if you want to develop your own tools (or other people for you), it's better to use the nodes at their lowest level. Why? Look at this:


click to enlarge
If you double-click the Guide Groom node at the root level, you go inside it, but as you can see from the red arrow in image 2 above, there is a greyed node. If you click it, you dive inside and can see all the nodes used mainly for visualization purposes: with, color, etc.
This is very useful, but if you developed your own code, you can not be sure if the error you get during the development is your fault or a conflict with one of these nodes.
Besides this, you have to go constantly inside and outside of your nodes to work with guides and hair.
So, what I usually do is build a simple guide visualizer that also has some features missing in the vanilla node. Let's see it quickly.

DViz is the visualizer. It's an hda, and before diving into it, let me explain why I used a split node before it.
As we will see in a second, I can change the color and width of the active and non-active guides with my visualizer. I need a way to feed it with this guide separation to do this.
If I were a nerd, I could have used some vex to put into my hda, but since I'm not, I have to use a more straightforward way. But, as you can see, I got to the point. This is crucial because if you have little nerd knowledge (I'm speaking to artists), you can make these little things that are extremely helpful in your everyday work.
The first step is to link the Guide Groom Group selection to the split Group. To do this, simply copy the parameter and paste the relative reference:


After that, I put Color and Wrangle nodes that I wrapped into an hda:

This is the vex I used in the Wrangle node to adjust the Width using a slider:
@width = ch("width");
And this is the result:

Just to have some fun, if you want, you can have a gradient version (darker at the roots) by adding these three nodes in each branch (so you can have complete control):

The Resample node is to get the Curveu attribute. So, disable the resample options (1) and check the Curve U Attribute option (2):

Now that we have added the Curveu attribute we can multiply it by the color using this vex inside the Wrangle node:
@Cd = @Cd * @curveu;
Finally drag and drop the Select Input parameter in you hda (as explained in the video above):

This is the upgraded version:

IMPORTANT
1.
If you want to sculpt, delete, etc., all the guides, you have to write * (means everything) in the Group field.
If you want to work on multiple groups, you have to write them since the Guide Groom node does not accept more than one selection
If you want to exclude a group, write * ^crown (for example)
2.
To see the width variation, you have to check the "Shade Open Curves In Viewport" option. You find it in the Misc tab of the Geo (allHere in my case) node where you have all your nodes:

Remember that this is a simple tool made by a no-nerd artist for visualisation purposes and it's far from being perfect.
GUIDE SCULPTING
To sculpt the guides, we need a Guide Groom node.
One important thing.
The second input of this node is for Skin, which is also used as a collision object. Since our guides grow from the scalp, the head is not taken into consideration. For this reason, we have to feed this input with it:


FIRST EXAMPLE
Having photos, drawings, or scans of the haircut is crucial. Unfortunately, not always, even in production, you can have them. Sometimes, you get only a frontal or three-quarter image and have to guess what's on the back.
Putting into practice what you have learned so far could be a solution.
Let's start with something simple, just to warm up:

click to enlarge
This is an image I found on the web. he cool thing is that you have all the lengths for each scalp zone for the most common haircuts.
Let's take this dude here as an example:

With only this image, it isn't easy to understand how lengths all go around the head. Nothing fancy, but having the scheme is very helpful:

All we have to do is to set our Length Control using those values:


click to enlarge
Houdini is not CAD software, so setting lengths is not possible (or complicated). Anyway, we are artists and don't need to be perfect. To roughly match the haircut sheet, since the head is 8 inches high and the front scalp area length is 3.9 inches, the guides are half the head. I used a couple of boxes to set this:

At this point I added "/2" after the sheet value in my Length Control:

After a very little work, we can get this:
click to enlarge
The cool thing is that if you change your Length Control "divider", you can have a new version that is consistent with the previous one:

click to enlarge
click to enlarge
Obviously, since the Guide Groom node is not procedural, you have to sculpt your guides again, but using scalp zones is very simple.
For example, having only the front image, with shorter guides, the back could be like this:

Or with very little effort, using the "smart selection" like this:

SCULPTING TIPS
Besides using the scalp zones, which allow you to have precise and quick selections, there are other very simple but helpful tips.
3 MOVES SCULPTING
It's a good practice to sculpt in steps: front, side, and top:

click to enlarge
LIFT TOOL AND CURVE MASK
Using these two features can be very helpful to get neat sculpted guides quickly:

click to enlarge
As first step use the sculpt tool until the guides stick the head:

Then use the lift tool adjusting the strength ramp to bulge the guides:

BLUR TOOL
In any sculpting process, blurring is fundamental. Groom sculpting is not an exception. As you can see in the image below, you can fix messy guides (circle) but also create smooth length transition (arrow):

click to enlarge
HAIRTECH APP CUT
Let's see now how we can follow a hairstylist cut sheet:

click to enlarge
It is worth saying that these cut schemes sometimes get so complicated that even hairstylists are unarmed.
This one is not that bad, so let's try.
As the first step, starting from the base scalp, using the scissors of the Topo Build node, I divided my scalp into two areas, which I called front and back:

Then, following the sheet I extended, cut the two parts and sculpted the guides:


click to enlarge

click to enlarge
Nothing fancy. After a quick blocking, I modeled the big clumps and then a simple hairgen setup.
The point here is that life can be easier with the cut sheets, having all the length and the main hair flow. Knowing the haircut structure can make the difference when hairstyles are complex and clumps melt.
CONCLUSIONS
Well, this is the end of this long tutorial. I hope it can be of any help.
This is only one of the billions of methods you can use to get your job done. The key point is that everyone should shape his or her workflow to work joyfully. We spend countless hours moving guides, and thanks to his toolbox structure, Houdini helps you get the best out of it. Evaluate what is the most important for you (for me, visualization) and shape your working tool accordingly.
One more thing before stepping into the resources.
Writing a tutorial is very time-consuming, but it gives you the chance to put it in order, elaborate on what you learned, and acquire new knowledge.
Writing this one, I went deeper into many of the concepts I described and built new tools I will use in my daily job.
So, I encourage you to do the same every time you learn something new. Write a tutorial and share it with the community.
RESOURCES
Besides the links I will give you in a second, I strongly suggest getting in touch and taking some lessons from a hairdresser. We usually approach grooming like sculptors, but we work in a 3D environment, and hair is usually simulated.
Second, observe natural hair while you are in a queue, when you play with your kids, when you are with your wife, and in every other situation when you interact with other people.
Third, add some nerditude to your job. Not that much, just a little bit. Keep painting your maps and moving every guide you need, but use Houdini nodes to build new tools (hda) that speed up your work and get as many variations as possible.
LINKS