After 10 years of shooting, editing and grading I decided that color correction should have been my main job.
During all these years I attended online and in presence courses with pro colorsists to be sure to become a pro myself.
I mainly use DaVinci resolve with a surface control and 10 bit calibrated monitors. I'm based in Italy but used to travel for job.
Ehilà Luca,
questo l'aggiornamento di oggi.
Anzitutto il mirror tool funziona magnificamente e questo ci permette, a costo zero, di avere il doppio delle variazioni (anche se magari non così significative). Non sono riuscito a far funzionare un "button" nell'interfaccia del controller (mi dirai come associare lo scrit da eseguire), per cui ho messo un integer 0/1:


INTRODUCTION
As part of the Rocket family, this all-in-one, artist-friendly tool delivers the final result with ease. Just connect your guide and start exploring with the sliders.
From shape to shading, everything is built in with granular control. And if you need more flexibility, the inputs and outputs let you push things even further.
Let’s dive in.
MENU
INSTALLATION
In the zip file you downloaded, you’ll find the following contents:
-
Sample_scene.hiplc
This is the scene used in the Quick Start video. It includes presets for both the curves and the braid, along with all the materials.
-
HDA
Before launching Houdini, copy the contents of this folder to:
Documents/houdiniXX/otls
-
IDX
Copy these two files to:
Documents/houdiniXX/presets/Sop
-
Textures
These are the texture maps used in the scene. Copy them to your preferred location and re-link the shaders to their new path.
QUICK START
For a Rocket start.
UNDER THE HOOD
Let’s take a look at the node graph and how I built Rocket Braid.
INPUTS AND OUTPUTS
Let’s take a look at the connections you’ll need to get started with the tool:

INPUTS
GUIDES
The tool is designed to work seamlessly with Houdini’s native grooming workflow, allowing you to plug in the output of a Guide Groom node directly.
SKIN
Feed this input to the mesh where you want your braid to grow.
VDB
Connect the VDB of your skin
ORNAMENT INPUTS
-
Branch rings
-
Braid Rings
-
Tip Cover
Here, you can connect your geometry for the braid ornaments, if you prefer not to use the built-in objects.
CUSTOM BACKBONE
This is a key aspect of Rocket Braid.
I originally built the tool for a gig, and later decided to improve it and share it with the community. Inside the HDA, I use a commercial plug-in called P3DBraid (https://shorturl.at/aJY8J) to generate the internal braid backbone curves.
Since I can’t legally distribute commercial tools for free, I added an extra input that allows you to use your braid backbone curves instead.
To use this option, connect your backbone generator or imported curves

and enable the Use External Backbone toggle at the top of the interface.

By doing this, you don’t need to connect guides to the first input. The Braid Size, Frequency, and Twist parameters will also have no effect, as your external backbone generator now drives these settings.
Rocket Braid is designed for a three-branch braid structure.
If you own the P3DBraid plug-in, you can unlock the HDA and place the P3DBraid curve generator (only this node) where the red null is located.
1. To unlock the HDA:
Right-click on Rocket Braid and select Allow Editing of Contents.
2. Access the network:
Double-click on Rocket Braid to enter the network. At the top of the chain, you’ll find the P3DBraid placeholder node (at the top of the node graph).


3. Now press Tab and search for P3DBraid. From the list, select and place only the first node.

4. Drop down the node and rename it to P3DBraid. This step is crucial, as all the exposed parameters inside the HDA rely on this exact node name to function properly.

5. Lastly, don’t forget to right-click on Rocket Braid and choose:
-
Save Node Type
-
Match Current Definition
This ensures your changes are saved and properly linked to the HDA.
OUTPUTS
HAIR
This outputs the final result made using the parameters exposed in the tool's GUI.
TIP SPHERE
The braid tip hair has two options:
-
Internal grooming, which is driven by the GUI parameters
-
External grooming made connecting a Guide Groom node to this output:

If you decide to use this option, remember to check the Use External Grooming in the Tip tab of the tool:


CLEAN GUIDES
Rocket Braid features a built-in grooming network that enables you to achieve professional results. But, if you want, you can add your modifiers to clean straight hair:

TIP HAIR
Using this output, you can visualize and concentrate only on the tip hair, speeding up your work.

ORNAMENT OUTPUTS
-
Ribbons
-
Braid rings
-
Left branch rings
-
Center branch rings
-
Right branch rings
-
Tip cover
By using these outputs, you gain full control over the shading of your custom ornaments. We’ll explore this feature in detail in the Ornament section.
GUI OVERVIEW
Core sections that make up the interface:

SECTION 1
This section is essential, as it holds the key to working faster and avoiding unnecessary roadblocks.
Tweaking parameters with the full hair display can be challenging, especially when using the Auto Update option. That’s why, during the creation and adjustment phase, it’s more efficient to view the braid as a set of tubes. Once you're satisfied with the result, you can switch back to the full hair display.
-
Display Tubes when enabled, you can also choose whether to show tube colors. If you disable this, the Display Tubes Color option will no longer be available.
-
Display Tip Proxy is a handy feature that makes it easy to adjust the position of the braid tip. It only works with the built-in grooming system, so make sure Use External Grooming in the Tip tab is unchecked:
We’ll explore the Tip position settings in more detail later when we go through the tab options.
-
Hair Thickness controls the width of the hair.
SECTION 2
This section contains all the parameters you need to shape and refine your braid.
BRAID SIZE
Control the width and depth of your braid. The ramp allows you to shape the width along the length of the braid for more precise styling:
Width - Depth
Width Ramp
FREQUENCY
This is the main control for adjusting frequency, using both the loops value and a ramp. Later, we’ll look at a dedicated field that lets you apply random variation along the length of the braid.
BRAID RADIUS
Here, you can use a ramp to uniformly control the width of all braid branches. Later, in the Shape Tweaks tab, we’ll explore how to adjust each branch individually.

TWIST
Here you can twist the whole braid or only a part using a ramp:
CRISS-CROSS SHRINK
This is a key section, the heart of Rocket Braid.
In real-world braids, the branch width isn’t uniform; it naturally narrows in the criss-cross areas:

To replicate this natural behavior, you have three parameters and a ramp:
-
Curvature Scale controls how much the branch narrows in the criss-cross areas.
-
Min Thickness sets the minimum diameter.
-
Max Thickness sets the maximum diameter.
-
The ramp defines how the effect is distributed along the length of the braid.

In this example, the values are exaggerated to clearly show the effect. Below is a more realistic version for comparison:
SHAPE TWEAKS
Irregularity is another key element of realism. In this tab, you'll find two main controls:
-
Variation is an automatic setting that randomly alters the shape of the three branches for a more natural look.
-
Granular Tweaks lets you fine-tune the braid’s appearance using a ramp for greater control.
Variation
Granular Tweaks
SECTION 3
This section focuses on hair generation. With Rocket Braid, you can achieve the final result without needing to add any extra nodes.
BRAID HAIR
Once you're happy with the braid shape, you can move on to the hair appearance. To do this, you have access to:
-
Density Multiplier
-
Amount
There are many ways to generate curves. In this case, I chose to use concentric tubes and extract curves from them (rather than scattering points, for example). The Density Multiplier acts as a simple switch: it lets you choose between a single tube (no inner hairs) or multiple tubes (inner hairs).
This method keeps the hair count low while preserving the braid’s original width. If the braid appears too sparse, you can increase the number of hairs using the Amount slider.
The low-density option is ideal for background characters or situations where close-up detail isn’t required.
To fake inner density and keep the same hair number, you can increase the Hair Thickness:
CLUMPS
Clumps are essential for achieving realistic hair, as they help break the uniform flow. I kept the setup simple to make clumping easy to control. You have:
-
Amount
Sets the number of advecting curves. Lower values result in more visible clumping.
-
Seed
A standard random seed to vary the clump pattern.

NOISE
For Rocket Braid, I developed a custom noise HDA that’s significantly faster than the default SOP and delivers a more natural look to the hair. I plan to release this tool later this month.
Noise is divided into two types:
-
Main
Applies noise directly to the braid hair for natural variation.

-
Untamed
Controls the percentage of hairs that break away from the main flow, adding wildness and imperfection.
In addition to the Main noise settings, this section includes two extra parameters: one to control the percentage of untamed hairs, and another for the random seed to vary their distribution.


FLYAWAYS
Along with clumps, flyaways are essential for achieving a realistic look. Variation and a touch of messiness go a long way in making the result feel natural.
This section is divided into two parts:

Flyaway Generation
-
Amount
Controls how many flyaway hairs are created.
-
Seed
Adds randomness to their distribution.
-
Tip Offset
Sets how far the flyaways drift from the braid.
Flyaway Noise
-
Noise Freq
Adjusts the frequency of the noise applied to the flyaways.
-
Noise Amp
Sets the intensity of the noise.
-
Seed
Randomizes the noise pattern.
HAIRS TWIST
This option adds even more life to the hair. As noted in the tab warning, you'll need to push the value to 7000 or higher to see a noticeable effect.
The ramp controls how the effect is applied along the length of the braid.

HAIR SHRINKER
This is another core feature of Rocket Braid, which I plan to release later as a standalone tool.
Shrink happens naturally whenever hair is constrained, whether in the criss-cross areas, under ring ornaments, or around hair ties.
By default, this option is turned off, as it involves heavy computation due to the high point count.
-
Resample Hair increases the quality of the shrink effect, but also raises computation time.
-
Shrink Inflate controls the overall intensity of the effect.

With a Shrink Inflate value of 0.2, the calculation time is around 30 seconds.
This is because the system needs to identify the shrink areas (where rings or shrink objects are), transfer the attributes to the hair, and apply per-point calculations.
Reducing the hair resolution or the number of shrink objects will help lower the computation time.
CONNECTION HAIR
Rocket Braid generates both the curves and the hair that connect the scalp to the braid. As part of the Rocket toolset, it includes all the parameters you need to achieve the final result.

This section is divided into four parts. Let’s take a closer look.
MAIN SETTINGS

-
1. DENSITY
Controls the number of hairs generated.
-
2. SHAPE
Think of this section as three large clumps—one for each braid branch. The ramp defines their shape.
-
3. CLUMP LENGTH
Adjusts the length of the connection between the scalp and the braid.
-
4. INFLUENCE RADIUS
Controls the width of the connection hairs, similar to how it's handled in a standard Hairgen node.
CLUMPS
To give this part a more natural look, I added a layer of clumping. You can adjust both the size and the profile.

NOISE
Powered by the new Rocket Noise HDA, this section offers the same controls as the braid hair:
-
Frequency
-
Amplitude
-
Seed
-
Ramp

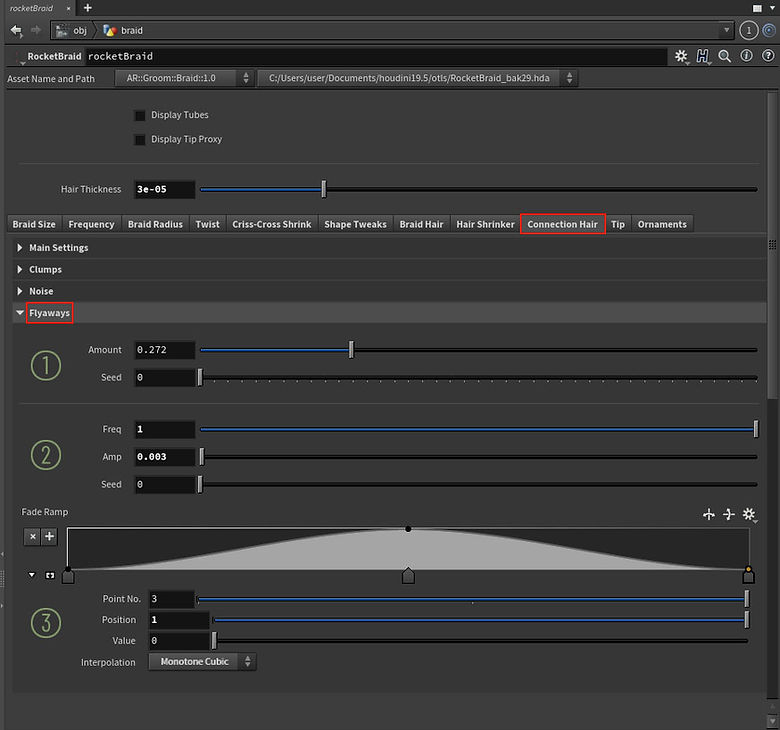
FLYAWAYS
Powered by the new Rocket Noise HDA, this section offers the same controls as the braid hair:
-
Amount
-
Seed
-
Frequency
-
Amplitude
-
Seed
-
Fade ramp
TIP
This section is another core feature of Rocket Braid. As mentioned earlier, you don’t need any additional nodes to achieve the result shown in this tutorial.
At the end of the braid, a pre-built sphere is included, complete with guides, hair, and modifiers, so you can create the final look directly within the tool.
At the top of this section, you’ll find the External Grooming checkbox. When enabled, the internal controls (except for the cover settings) will be hidden, and you can plug your tip curves into the second output of the HDA.
Here are the available internal parameters:
-
Hair

-
Tip Shape
You can shape your tip using this ramp.
-
Root Width
Controls the width of the root area of the tip. It’s recommended to adjust this when you modify the cover shape.

-
Amount
Sets the number of hairs generated for the tip area.
-
Length
Controls the length of the tip hair.
-
Direction
To make the most of this control, I recommend enabling Display Tip Proxy at the top of the interface. This allows you to use Auto Update and interactively adjust the tip position with real-time feedback.

-
Noise
Uses the same settings as the other parts of the braid.
-
Clumps
This section is divided into four parts and manages the clumping behavior of the tip hair.

-
Clump Amount
-
Clump Seed
-
Clump Profile
These parameters let you shape the tip, though in most cases, minimal tweaking is needed. For more advanced control, you can switch to External Grooming.
-
Guide Noise Freq
-
Guide Noise Amp
-
Guide Noise Seed
-
Noise Fade Ramp
These settings are specifically designed for controlling the clump guides.
-
Flyaways
The same familiar settings, but essential for achieving a natural, believable look.
TIP COVER
Rocket Braid includes built-in, resizable, and UV-ready ornament objects. However, if you prefer to use your own custom shape, you can simply connect it to the third input.

-
Use Input Shape
Plug in your custom ornament geometry here.
-
Material
Select the material to apply. The sample scene includes the shaders used in the tutorial.
-
Uniform Scale
-
Width
-
Height
Use these parameters to fine-tune the shape of the tip cover.
SECTION 4
ORNAMENTS
This is another standout feature of Rocket Braid. To enhance the look, the tool includes built-in ornaments that are fully resizable and UV-mapped, ready for use. However, if you prefer, you can easily use your own custom geometry instead.

Ornaments are organized into two main categories and are hidden by default.
-
RIBBONS

Each branch has its ribbon, and you can adjust the following settings:
-
Show
Toggle the visibility of the ribbon geometry.
-
Color
Select a color to easily identify which ribbon you're currently working on.
-
Width
Controls the width of the ribbon.
-
Position
Rotates the ribbon around the branch surface.
-
Braid Offset
Offsets the ribbon outward from the branch. This setting accounts for curvature, keeping the ribbon close in the criss-cross areas and farther away elsewhere.

-
Material
Choose the material to apply. Ribbons have UVs, so you can export them via the outputs and create your custom shaders.
RINGS
There are two types of rings available: Branch Rings and Braid Rings.
-
BRANCH RINGS

These first three parameters control all branch rings globally.
-
Show
Toggle the visibility of the rings.
-
Use Input Shape
Enable this option if you've connected custom geometry to the first ornaments input.
-
Orient Variation
This is a quick and effective way to add orientation variation to your rings, enhancing realism.
The following settings are organized into three tabs (one for each branch) and offer the same controls for each set of rings.
-
Color
This is a preview color that helps to quickly identify the rings you are working on
-
Amount
Sets the number of rings to generate. For best results, avoid going below 50. If you want a sparser distribution, use the next two settings.
-
Random Skip Chance
Randomly removes some rings to create a more natural, uneven spacing.
-
Random Seed
Changes the random pattern used for skipping rings.

-
Material
Using the built-in UVs and the Ornament Outputs, you can unleash your creativity.

The built-in rings come with UVs, allowing you to export them to any 3D painting software and start creating custom shaders right away.
However, since all the rings share the same UV layout, they will render identically by default.
To introduce variation across your ornaments, you have two options:
1. USER DATA FLOAT
To use this option, make sure to enable the Use Color Shift checkbox.
Inside your material network, you can add a User Data Float node and connect it to any surface input (e.g., color, roughness, etc.). This lets you drive the shader using the Remap Attribute Ramp.
As a reminder, below the Use Color Shift toggle, you’ll find a message displaying the name of the attribute you have to use for the shader variation:
-
ring_id_left_f
-
ring_id_center_f
-
ring_id_right_f


The more points you add to the curve, the greater the variation along the length of the braid.
2. EXPORT THE ORNAMENTS GEO
The alternative shading approach is to export your ornament geometry using the provided outputs. If you want to create a one-size-fits-all shader, you can isolate a single ring and import it, along with its UVs, into a 3D painting software for texturing.
If you want full control, import the mesh into your preferred 3D painting software without relying on the built-in UVs.
In Substance Painter, for example, you can use the Auto Unwrap feature to generate new UVs directly on your geometry.

This approach gives you full control to paint directly along the braid, allowing for detailed tweaks from top to bottom.
Once you're ready, export the geometry, along with the textures, from your 3D painting software, and merge it back into the Rocket Braid node.

Remember to set the Amount of rings to 0 to avoid generating duplicate geometry.

Here’s the result.

-
Distribution
Here, you can choose where to place the rings along the length of the braid.


-
Braid Offset
Branch rings are linked to the width of the branches. This means you can freely tweak the branch shapes, and the rings will automatically adapt to match.
You can use the braid offset to avoid hair trespassing or for artistic reasons.
-
Height Ramp
Here, you can adjust the ring height to your liking.


Keep in mind that the ramp controls the effect along the entire length of the braid, not the distribution of the rings.

Lastly, you can set ramp point values above 1 to extend the range of the effect.

-
BRAID RINGS

This type of ornament wraps around the entire braid. Everything mentioned for branch rings also applies here.
The only difference is that you’ll need to control the width using a ramp, as it isn’t linked to the braid’s width.

CONCLUSION
We’ve reached the end of this journey.
I hope everything feels clear and easy to use. I spent a lot of time developing Rocket Braid as a tool I would trust in production—built by an artist, for artists, with a passion for R&D.
Like the other tools in the Rocket family, it’s designed to be intuitive, flexible, and production-ready.
You now have all the information you need to tailor the tool to your needs, improve it, and—hopefully—share your enhanced version with the community.
Best of luck, and enjoy creating!